Pages

Monday, March 9, 2015

Mr. and Mrs. WordArt

Wedding season is just around the corner, and as part of this month's Silhouette Challenge of WordArt/Typography I wanted to share with you this fun floating frame I designed as a gift for my brother and sister-in-law. (Check out more awesome posts typography and word art posts at the bottom of this post!)
I'm sure you've seen lots of similar signs on Pinterest - there were so many to choose from and I had a hard time narrowing down just what I wanted.  After lots of debate, and lots of searching for the perfect frame, this is what I came up with.
I did all of my designing in Silhouette Studio.  First I made my page size the same size as the glass.  It helped to be able to use the color dropper to fill in the shapes and words to get a better idea of what the final product would look like.  Overall, this is a pretty simple project, but there were so many fonts to choose from!  That was the hardest part, choosing a font (or pairs of fonts).  I knew I wanted something that was solid and bold and would cut easily.  I also wanted to make the letters fairly thick, so the silver would show up (even though it's tough to see in some of the pictures!)  I knew I wanted to keep the colors as silver and blue, since that was their wedding colors.
The frame is a floating frame from Hobby Lobby (score half off frames!).  I didn't like the double layer of glass, so I actually took one layer of glass out and then used hot glue to hold the second layer of glass in place so it wouldn't rattle.
Once all the design work was done, I cut out the blue first.  Since the project was not overly large, I did use the mat to cut my vinyl (I think it helps keep things from slipping!).  Using transfer tape helped me to keep the spacing correct.  Since the silver words were smaller, I chose to place them by hand - I was trying to be conservative with my vinyl.  It would have been easier to use one of the tutorials from Silhouette school to easily keep the spacing with the multiple colors, but since the silver bits were fairly small, and so spaced out, I didn't want to waste that much vinyl.  So I used my trusty transfer tape and measured (and double checked!) and placed the date, mr, mrs, and heart on my own. 
This was my first big project with vinyl and first using multiple colors.  I learned some new tricks and things I would do differently next time, but I'm super happy with how it turned out.
Can't wait to see what I can make next with my Cameo!

Want to Check Out More Silhouette Projects?

My Silhouette Challenge buddies and I are all sharing projects on our blogs today, so peruse the projects below for a wealth of Silhouette inspiration!
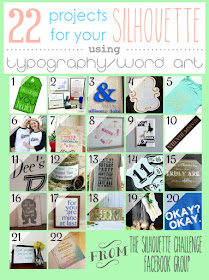
St. Patrick's Day Gift Tag with {FREE Cut File}The Fine PrintMr. and Mrs. Word ArtHe is Risen Easter Silhouette ArtDIY "Make Pretty Things" Graphic TeeBride & Groom Baseball ShirtsUsing Sketch Pens (and Markers!) For BeginnersHeart Shaped Vinyl Word ArtStar Wars Light Switch - Silhouette ChallengePallet Wood Roman Numeral Anniversary Signhow to cut LARGE Vinyl DecalsCreating Labels with Sketch Pens - March Silhouette ChallengeAin't No Party Like A Gatsby Party T-ShirtDIY Faux Enamel TagsHarry Potter Word ArtWhere the Wild Things Are Pallet Sign"At Last" Framed Vinyl Word ArtLucky Pallet SignSt. Patrick's Day Etched Glass Jar GiftThe Fault In Our Stars Inspired Shirt - Okay? Okay.Silhouette Craft Projects: Framed Irish ProverbSketch out an Inspiring Quote

1. My Paper Craze // 2. The Stamp Doc // 3. Peanut Life Adventures // 4. Creative Ramblings // 5. Pitter and Glink // 6. The Thinking Closet // 7. Single Yet Married Mom // 8. unOriginalMom // 9. Sisters, What! // 10. Where The Smiles Have Been // 11. From Whine to Whine // 12. Adventures in All Things Food // 13. Practically Functional // 14. Patina Paradise // 15. Please Excuse My Craftermath... // 16. Weekend Craft // 17. Two Purple Couches // 18. Ribbons & Glue // 19. TitiCrafty // 20. Simply Kelly Designs // 21. Confessions of an Overworked Mom // 22. Get Silvered


Linking up at some of these great parties!


Tuesday, March 3, 2015

Feb Updated on Goals

Yes, I missed the January update - consider that my house was under construction - we're renovating our only bathroom - so life was very crazy at the end of the month.  We had several mix-ups and delays, but hopefully by the end of this week everything will FINALLY be done in our gorgeous new bathroom!  :)
Without further ado, here's my update on my goal progess. 

They're baaaaack!  In 2013 I made goals (I don't like the word resolution) and updated you every month.
I missed doing that in 2014.  2015 is going to be a busy year, I am sure, but I missed the written down goals and looking at my progress throughout the year.  So I'm writing down a few goals for this year to give myself some guidance.

1. Run 215 miles (yes, this mileage is shorter than my goals in previous years, but I've been so sore lately, I've barely been able to run, so I need to slowly build a solid base again)
I think I've run maybe two miles this entire year - not off to a good start!
2. Knit 5 Chemo Caps
I have 1/2 of one done!
3. Finish my next prayer shawl
No progress on this yet.
4. Make 52 Cards for Operation Write Home
Haven't started these - I've been making some personal cards instead.
5. Personal goal - not exactly sure on this one yet - stay tuned :)
6. Date night with my husband - at least once a month!
Mission accomplished in Feb - we had a lovely Valentines weekend away including a Cross Country Ski race called book across the bay
7. Open an Etsy shop and sell at least one item (to someone who is not my mom, lol)
I started doing some prep work with some items, getting them ready to go and writing descriptions, but it's not open yet
8. I also want to do Project Pinterest again - this year I want to actually DO 15 things I pin on Pinterest :)
  1. In Jan I make crockpot apple oatmeal


These are the things I would like to do this year.  What are your goals for the new year?

Linking up at some of these great parties!

Monday, January 12, 2015

Organize that Tupperware!

Happy New Year Everyone!  I am so excited to be back to blogging :)  How are your new year's resolutions going?  Is one of them to be more organized?
With the turn of the year, many people use this time to a fresh start and try to get more organized in their life.  Last year I shared with you a binder I made to organize my homemade birthday cards.  This year, I am sharing with you how I organized my baking cabinet.  It also happens to be part of the Silhouette Challenge and I am so excited to take part in my first challenge.  (Can I just say I love my Silhouette Cameo?!  I really do - it's been awesome to learn to use is the last several months and there are so many amazing projects out there.  I can't wait to share more of the cute things I have made, but those are posts for another day :)
So clearly I love to bake - if you know me or have been reading long, you will find many yummy treats on here.  Every good baker needs to have her supplies easily accessible.  One of the things I loved about my husband's house when we first got married was the space for my baking supplies - It was a serious treat after having things stuffed in odd places in my tiny galley kitchen in my apartment.

While I love my baking cabinet, it definitely needed a bit of a face-lift and some organization.  This project fit the bill and was a super simple one to tackle.
The first thing I did was measure the face of each of the different sizes of Tupperware I wanted to label.

Next I picked a font I liked (I used KC Lemonade - so fun!)  (second side note - KC Lemonade came from dafont.com) and typed out my labels in the Studio program.  The KC font was pretty good, but to be on the safe side, I did offset the text by .02, just to make it a tiny bit thicker and easier to cut out.
I double check my measurements, to make sure that everything would fit, then it was time to cut!  I used Oracle 651 vinyl and used the default cut settings in Studio for vinyl.  I also used my mat when I was cutting.  
Once everything was cut out, it was time to weed it out (get rid of all the parts of vinyl you don't want, leaving just your letters)
I didn't have any transfer tape at the time, so I used a lint roller sheet instead.  Place your transfer tape over your design, and use your scraper tool to get it to stick to your letters.  Then slowly peel the backing away.  Now place your letters on your Tupperware and use the scraper tool again to get the vinyl to adhere to your Tupperware.  


Repeat as needed for each label you made. 
Ta Da!  All neatly labeled.  Now I not forever confusing my flour and sugar at first glace.  


I love how my cabinet looks now too - all pretty and organized.


Thanks for stopping by!


Want to Check Out More Silhouette Projects?

My Silhouette Challenge buddies and I are all sharing projects on our blogs today, so peruse the projects below for a wealth of Silhouette inspiration!

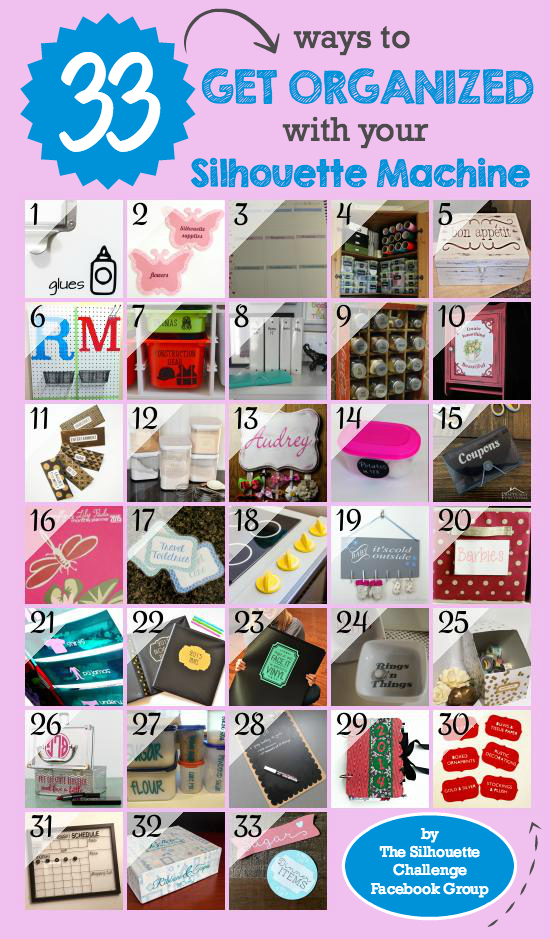
Organizing With Icons Butterfly Labels Customizing Your Erin Condren Life Planner Weekly Layout Organizing Your Craft Supplies with Labels Weekly Menu Box Peg Board Entry Way Order In Kid Land A Fun Way to Label Binders Sugar and Spice Looking Oh So Nice Turning a Plain Cabinet into Something Beautiful DIY Cash Budget Envelopes Flour and Sugar Pantry Container Labels Personalized Hair Bow Organizer Organize your Refrigerator DIY Vinyl Decorated Coupon Organizer 2015 Blog Planner Designed For Dragonfly & Lily Pads Laminated Labels with Your Silhouette The Secrets of How We Built Our DIY Play Kitchen Creative Way to Dry Winter Mittens Organizing Canvas Toy Bins with Labels Kids Closet Storage {with Rubbermaid Drawer Dresser and Vinyl Labels} Cute Gold Binder Labels {2015 Organization} Easy Vinyl Storage Organization and TWO Free Cut Files Personalized Ring Holders Upcycle for Organization Organizing Makeup with Style: A Monogrammed Makeup Case Vinyl Tupperware Labels How to Make a Chalkboard Clipboard Christmas Card Memory Book Simple DIY Holiday Storage Labels DIY Vinyl Frame Calendar with {FREE CUT FILE} Ribbons & Tapes Upcycled Organizing Box Print and Cut Pantry Labels
1. Please Excuse My Craftermath... // 2. Simply Kelly Designs // 3. Daily Dwelling // 4. Ginger Snap Crafts // 5. Our Southern Home // 6. Sowdering About // 7. The Moberg Family // 8. Decor Adventures // 9. Pineapples and Pinecones // 10. Patina Paradise // 11. The Thinking Closet // 12. It Happens in a Blink // 13. Adventures in All Things Food // 14. From Wine to Whine // 15. Practically Functional // 16. Dragonfly & Lily Pads // 17. unOriginal Mom // 18. One Dog Woof // 19. Creative Ramblings // 20. My Favorite Finds // 21. Create it. Go! // 22. A Prudent Life // 23. Where The Smiles Have Been // 24. Barb's Life // 25. Everyday Paper // 26. Pitter and Glink // 27. Peanut Life Adventures // 28. Feto Soap Blog // 29. Our Rosey Life // 30. Two Purple Couches // 31. My Paper Craze // 32. TitiCrafty // 33. Lil Mrs Tori


Tuesday, January 6, 2015

Goals in 2015

They're baaaaack!  In 2013 I made goals (I don't like the word resolution) and updated you every month.
I missed doing that in 2014.  2015 is going to be a busy year, I am sure, but I missed the written down goals and looking at my progress throughout the year.  So I'm writing down a few goals for this year to give myself some guidance.

1. Run 215 miles (yes, this mileage is shorter than my goals in previous years, but I've been so sore lately, I've barely been able to run, so I need to slowly build a solid base again)
2. Knit 5 Chemo Caps
3. Finish my next prayer shawl
4. Make 52 Cards for Operation Write Home
5. Personal goal - not exactly sure on this one yet - stay tuned :)
6. Date night with my husband - at least once a month!
7. Open an Etsy shop and sell at least one item (to someone who is not my mom, lol)
8. I also want to do Project Pinterest again - this year I want to actually DO 15 things I pin on Pinterest :)


These are the things I would like to do this year.  What are your goals for the new year?

Linking up at some of these great parties!

Thursday, January 1, 2015

Happy 2015!

Happy New Year!  I can't believe that 2014 is already over.  It seems like the year sure flew by.  While 2014 was less eventful for my family that 2013 had been, it was a very busy year none the less.

Early 2014 saw us in the grips of bitter cold - M and I made the best of things by going skiing nearly every weekend.


As spring arrived, I lost my grandfather and celebrated the wedding of my best friend - all in the same week.

During summer I participated in 100 Happy Days and found lots of small things to celebrate every day.  As usual, the summer went by way to quickly, but the highlight of our summer were three camping trips, one with my parents, one with friends, and one with M's parents.


Summer came to the end with the wedding of my brother and I became a godmother to my cousin's son!

Fall saw me return to work as an adviser at my online school, working with 8th graders again.  They sure keep me busy.
The biggest change in our year happened in November when my husband decided he had had enough of the crazy schedule working for the sound and production company and returned to work as an electrician in a neighboring town.  It's been an adjustment for us both, but we are enjoying having our weekends together again!
We closed out 2014 listening to our favorite band.  M worked for his old company for the night and we rang in the New Year with Brat Pack Radio.

I know I've been absent on here for quite awhile (blame my computer needing to get sent back for repairs the week of Thanksgiving and then scrambling to finish up last minute Christmas gifts), but I have lots of fun things to share with you for the new year.  I've been busy while I've been on break from work preparing posts.  I'm going to start small, and plan to post at least once a week, if I get enough ideas stocked up, then I'll go for more :)  I can't wait to share with you some of my recent craft projects and kitchen successes!
I hope you all have a wonderful new year!