Showing posts with label holidays. Show all posts

Monday, November 3, 2014

Loaded Cookie Bars

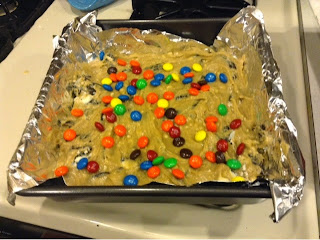
I hope you all had a great weekend (and fun celebrating Halloween if you do so).  Post Halloween there is usually lots of candy and treats lying around, so it's a great time to make these cookies.  The base dough stays the same, but you can basically chose your mix-ins, depending on what you have on hand, leftover, or whatever sounds good!  Oreos or graham crackers add a perfect crunch, and M&Ms, chocolate chips, or a variety of bit sized candy bars add some sweetness.  These cookies really leave it up to you!
These make up in no time at all and are great treat to share, or enjoy on your own with a tall glass of milk.  I took them to work with me and they lasted just minutes!

Loaded Cookie Bars
Recipe Adapted from Averi Cooks

Ingredients:
1/2 cup unsalted butter, melted
1 egg
1 cup brown sugar
1 TBSP vanilla
1 cup flour
2 cups/12 chopped Oreos (or grahman crackers, or pretzels, or other cookies)
1/2 cup M&Ms (or other candy/chocolate chips)

Directions:
To begin, preheat oven to 350 degrees.  Then prep an 8x8 pan with foil and spay with cooking spray.
Begin making the cookies by melting the butter.  Let cool slightly, then add egg.  Mix in brown sugar and vanilla and mix until smoother.  Next, add the flour and stir until just combined, being careful to not overmix.  Then it is time to fold in your add ons.  I used Oreos and M&Ms but you can use whatever you want!  I mixed in half of my M&Ms and held back the other half.
Place batter into pan and smooth or pat out as best you can (dough will be very very sticky).  Then sprinkle remaining M&Ms or candy on top of the batter. 
Bake for 20 to 22 minutes.  Top should not look doughy and the edges should be just barely browning.  If you can, use a toothpick to test the center.
Make sure to let the bars cool in the pan for at least a half hour before slicing.  Store in an airtight container. 
Enjoy!


Linking up at some of these great parties!


Monday, June 30, 2014

Painted Star Cookies

Happy 4th of July week!  I can't believe June has come and gone already.  Why does summer go by way to fast?  I'm excited to be sharing this post and participating in Raise.com's 4th of July Celebration! (PS - Raise.com has an exchange program to buy and sell gift cards, if you haven't already checked it out, I encourage you to do so!)  But back to this delicious (and easy!) recipe!
I love celebrating the 4th of July!  Even though my husband has to work, we still make it a good day.  We always have our friends over for a badminton tournament in-between my husband's morning set up, and having to go back to work for the concert.  We love to play badminton with our friends and we always have lots of good things to eat and grill and have our own early cookout.  Of course, I have to make dessert :)  Usually I make a cake, but sometimes cookies are good for sweet treats on the go!

I found these cookies when I was searching for a recipe to use an egg yolk.  (Let me tell you, it was a long search!).  When I make sugar cookie bars, they need one egg and one egg white.  What to do with the leftover yolk?  I have been on the hunt for recipes that use just one egg  yolk.  This is one that I came across that I think I will be making a lot more in the future - super duper easy and gives the impression of frosted cookies without all the work!
What do you do with your family to celebrate the 4th of July?

Painted Star Cookies
Recipe Adapted from Gwenny Penny

Ingredients:
  • 3/4 cup Crisco/shortening
  • 1 cup sugar
  • 2 eggs
  • 1 tsp vanilla
  • 2½ cups flour
  • 1 tsp baking powder
  • 1 tsp salt
  • 1 egg yolk
Directions:
To begin, cream together the shortening, sugar, eggs, and vanilla.  Slowly blend in the flour, baking powder, and salt.  Chill dough for at least an hour.
Once dough has chilled, roll out on a floured surface and cut with cookie cutters.  Aim for about 1/4 inch thick.  Place cookies on ungreased baking sheet (or baking sheets covered with silicone mats - I love 'em!).


 Now for the fun part - decorating!  Do this before baking!  Mix one egg yolk with 1/4 tsp water.  Separate the mixture into small bowls and color with food coloring - I used gel food coloring for a richer color. Once you have reached your desired color, take a paintbrush and paint the egg yolk onto the unbaked cookies.  I just used paintbrushes from the kids section at the craft store that I got for a dollar. 


Once decorated, bake at 400 degrees for six minutes.  Don't over bake!  And bam!  You have decorated cookies, that you don't have to frost after baking - love simple recipes like this!


Happy 4th of July!


<-- Click for nutritional info and a printer friendly version

Linking up at some of these great parties!


Monday, December 23, 2013

Top 5 Traditional Christmas Cookies


I love love love to bake at Christmas time.  I always have a set of traditional recipes that I make.  It just doesn't seem like Christmas can arrive until I have baked these items.  :)  Even when I was in college I would always have a baking marathon as soon as I got home after finals so that I could make these traditional cookies for my family.
Without further ado, here are my top five Christmas recipes

1. Traditional Cutout Cookies
 These cookies entered my family in the 1960s when my aunt started baking (that's what the recipe card says :).  My mom and I have been making these for as long as I can remember, I think I took over sole "rolling out" duties when I was 8 or 10.  It's a huge batch, but they always disappear fast!

2. Candy Cane Cookies
I love the "twist" on these cookies.  They also have a great taste.

3. Christmas Tree Cookies
These are cookies my mom made with her mom and the old aluminum crank cookie press.  I never met my grandma, but I like making these in honor of her each year.  Plus, these ones freeze great, my mom likes them best straight out of the freezer.

4. Chocolate Spritz Cookies
Again, another recipe from my mom's mom and her cookie press.  These are my mom and Opa's favorite cookies, while I don't enjoy chocolate, I love to make them to share with my family.

5. Kris Kringle Cookies
These are the "new" cookies on the block.  I love almond cookies and we received this cookie mold as a gift in the early 1990s and they were added to our cookie line up.

So those are my top five cookies that I make each and every year.  How many different cookies do you make each year?  What is your favorite traditional recipe?  Feel free to share!  Have a wonderful holidays everyone!

Linking Up
Linking up:
Monday
A Round TuitMasterpiece MondayMarket Yourself MondayRecipe Sharing MondayMelt in Your Mouth MondayMotivate Me MondayMade by You MondaysMade with LoveCraft-O-Manic MondaySweet Sharing MondayMarvelous MondaysMix it Up MondaysMake it PrettyMop It Up MondayBusy Monday,
Wednesday
Thursday
Weekend
Weekend Wrap UpStrut Your StuffCheck me Out Show and TellSaturday SpotlightGreat IdeasYour Great IdeaShare it SaturdaySaturday Sunday ShowcaseThink PinkNifty Thrifty SundayNot Baaad SundayScrumptious Sunday Recipe Link PartyThat DIY Party,Overflowing with Creativity PartyA Bouquet of TalentWill Cook for Smiles

Monday, July 8, 2013

Colored Sugar Cookies

Happy Monday!  I can't believe 4th of July is past and the summer continues to fly by.  I had a great 4th of July celebrating with my husband and inviting our friends over for our 3rd annual cookout and badminton tournament.  It was a great day.  I was in charge of desserts for the day, and I made a cake (recipe coming soon) and these simple colored sugar cookies.  I know that the 4th of July is already past, but the awesome thing about this recipe is that they are perfect for any holiday - just change the sugar color and you have a perfect festive treat.  So I wanted to share them with you now.  Enjoy!

Colored Sugar Cookies
Adapted from My Sweet Mission

Ingredients:
  • 1 cup (2 sticks) of room temperature butter 
  • 1 teaspoon salt 
  • 2 eggs
  • 1 teaspoon vanilla extract 
  • 1 teaspoon baking powder 
  • 1 teaspoon baking soda 
  • 1 1/2 cups granulated sugar 
  • 3 1/4 cup flou
  • 3 Tablespoons (1 each) of desired colors of sugar (you can either use the store bought kind, or dye your own sugar using food coloring!)
Directions:
Cream the softened butter, sugar, and salt. Add in the eggs and vanilla and mix well. Batter should be pale yellow and fluffy. Add in one cup of flour, the baking powder, and baking soda. Mix briefly, then add the rest of the flour. Use a cookie scoop to dish out the dough. In small bowls, place 1 tablespoon of desired colored sugar. Roll dough in colored sugar and place on baking pan 2 inches apart (these cookies do spread!). I found it helpful to use the back of a spoon to slightly press down on the cookie.
Bake at 360 degrees for 10-12 minutes.  Let cool for at least 5 minutes on pan before transfering to wire rack to finish cooling.  These cookies can also be made ahead of store and put in the freezer in an airtight container.  
Enjoy!


Linking up:

Monday
Tuesday
Anti-Procrastination Tuesday, Homemade TuesdayNifty Thrifty TuesdayTake a Look TuesdayToo Cute TuesdayOne Project at a TimeTasteful TuesdayTell me TuesdayTrick or Treat Tuesday,Tuesday Talent ShowTwo Cup TuesdayMemories by the MileTotally Tasteful TuesdaysTuesday ConfessionalTime for You Tuesday, Gathering Spot, Take it On Tuesday, You're Gonna Love it Tuesday, All my Bloggy FriendsTuesday to DoPin it TuesdayTasty Tuesday
Wednesday
Create and ShareSugar and SpiceWhat I Whipped UpWhatever Goes WednesdayShow me what ya GotLil LunaWow me Wesdnesday{Wow Me} WednesdayCast PartyRecipe RoundupYour Whims WednesdayWhat's Cooking WednesdayFluster's Creative MusterWednesday WhatsitShow and ShareDream to Reality, Wow Us Wednesday, What We Wore, Read, and Made, Whatcha Work-Up, A Little Bird Told Me,
Thursday
Friday
Weekend re-TreatFoodie FridayShow and Tell FridayFriday FavoritesSimply CreateLovely Crafty WeekendEBKTSWeekend WanderWeekend Show OffWeekend Bloggy ReadingFlaunt it Friday504 MainFriday FavsFancy This Friday, Flash Blog Friday, Finished FridayFreedom FridayShow off Friday, Happy HourI <3 Friday, Keep Calm and Link Up, Weekend Wonders,
Weekend
Weekend Wrap UpSay G'dayStrut Your StuffCheck me Out Show and TellSaturday SpotlightGreat IdeasYour Great IdeaSimply Sweet SaturdayShare it SaturdaySaturday Show and TellSunday ScoopSunday ShowcaseThink PinkNifty Thrifty SundayNot Baaad SundayScrumptious Sunday Recipe Link PartyThat DIY Party,Overflowing with Creativity PartyA Bouquet of TalentWill Cook for Smiles

Sunday, March 31, 2013

Happy Easter!

Happy Easter!  I hope you all have a wonderful day with your families!

Friday, February 15, 2013

Valentines day Cards

I love love love to make Valentines day cards :)  Everyone, even if they don't have a sweetheart, deserve a happy note on Valentines day.  Plus, who doesn't love to get something in the mail that isn't a bill.  Now that my Madison friend has taught me a bit about card making, I decided to put some of those skills to use to make this year's edition of a Valentines day card.
I got my inspiration for this card from Pinterest.

Happy day after Valentines day!  (I couldn't share this early because I didn't want to ruin the surprise for any of my friends who might be reading the blog)

And now, I'm off on my honeymoon :)  - so no posts for the next week or so (or for a little while anyway).  Everyone stay warm!

Tuesday, December 25, 2012

Merry Christmas!

Merry Christmas everyone!   M and I celebrated our first Christmas as a married couple :)  We are looking forward to starting our own Christmas traditions.
I hope you all had a wonderful day and got to spend lots of time with family and friends. And safe travels to those who are taking to the roads and skies.

Monday, December 10, 2012

Christmas Countdown Kisses

Remember the advent calendars you had as a kid?  My aunt would always mail one to us, the kind where you had the chocolate each day and it told the Christmas story. 
Pinterest was full of advent calendar ideas in the week around Thanksgiving.  I saw this on and I fell in love with it. 

I wanted to start a tradition of doing an advent calendar with Matt, but didn't want to go buy one, but I've been busy so I went for this nice and simple one. 
All you need is some saran wrap, Hershey's Kisses, and some spare yarn or string.

Take about 2-3 feet of saran wrap and lay it down on the floor. (it's ok if you run out, saran wrap is nice and sticks to itself, so if you run out of room, you can always add more)  Place your kisses in the middle and wrap them up burrito style.  Tie a piece of string below each kiss to hold it in place.  You'll want to tie it tight and double knot it.
Tie a string with a loop at the top so you can hand it somewhere.  I have ours hung over our calendar in the kitchen.
And ta-da.  A chocolate Kiss for each day leading up to Chrismas.  Matt gets a kiss and so do I :)  I think I'll like this plan!


Idea from: It's Overflowing


Linking up with these great parties


SixSistersStuff.comOr so she says

Thursday, November 22, 2012

I'm thankful for

This year I have so incredibly much to be thankful for.  Sometimes I look at my life, and I'm like, wow, is this really my life?  Things have really been on an upward swing the last few years and I am so grateful for all of the many good things in my life.

I am so thankful to be married to the most amazing man!  Matt is so sweet and caring.  He's a great listener and I can talk to him about anything.  He is calm and supportive.  He takes great care of me and makes me feel safe.  (and he kills bugs for me!)


I am thankful that we had such a beautiful wedding.  It was such an amazing day and I'm thankful that so many of our friends and families were able to come and celebrate the beginning of our marriage with us. (and in a way I am thankful the stress of planning the wedding is over)


I am thankful for my family.  They are always there for me.  We all have our unique quirks and we love each other.  Its so nice to have a group of people that you can 100% relax around, who will love you no matter what, and who know you so well.

I am thankful for my friends  for their help and listening ears.  I am thankful (and I miss) girl's nights.  I am thankful that I'm starting to build a good group of new friends here.


 I am thankful that Matt and I have jobs, and that mine has decent benefits that he is now able to share.  My job has definitely not been my favorite thing this year, and it has been very stressful, but I am thankful to be employed.

Wednesday, October 31, 2012

Halloween!

Happy Halloween!!!!

I love the opportunity to play dress up and be someone else for a night.  My new husband also likes to decorate the house.


Here's a photo tour of our living room
Top of the Bookshelf

My Ghosty - I used to have a haunted house to match, but my mom got rid of it after I got my finger in the outlet one day when I plugged it in when I was 4. 

Living room with pumpkin lights and the window


On Monday night Matt and I carved our pumpkins.  I went simple this year, as we didn't start until 9 pm.  Matt kept laughing at me as I pulled out the "guts"  It should be gross, but I always think its a little fun to clean out the insides of the pumpkins :)
Matty wearing my Halo for good measure

Hard at work

Whose is whose?

M and I with our pumpkins :)


Related Posts Plugin for WordPress, Blogger...