Showing posts with label DIY. Show all posts

Monday, March 9, 2015

Mr. and Mrs. WordArt

Wedding season is just around the corner, and as part of this month's Silhouette Challenge of WordArt/Typography I wanted to share with you this fun floating frame I designed as a gift for my brother and sister-in-law. (Check out more awesome posts typography and word art posts at the bottom of this post!)
I'm sure you've seen lots of similar signs on Pinterest - there were so many to choose from and I had a hard time narrowing down just what I wanted.  After lots of debate, and lots of searching for the perfect frame, this is what I came up with.
I did all of my designing in Silhouette Studio.  First I made my page size the same size as the glass.  It helped to be able to use the color dropper to fill in the shapes and words to get a better idea of what the final product would look like.  Overall, this is a pretty simple project, but there were so many fonts to choose from!  That was the hardest part, choosing a font (or pairs of fonts).  I knew I wanted something that was solid and bold and would cut easily.  I also wanted to make the letters fairly thick, so the silver would show up (even though it's tough to see in some of the pictures!)  I knew I wanted to keep the colors as silver and blue, since that was their wedding colors.
The frame is a floating frame from Hobby Lobby (score half off frames!).  I didn't like the double layer of glass, so I actually took one layer of glass out and then used hot glue to hold the second layer of glass in place so it wouldn't rattle.
Once all the design work was done, I cut out the blue first.  Since the project was not overly large, I did use the mat to cut my vinyl (I think it helps keep things from slipping!).  Using transfer tape helped me to keep the spacing correct.  Since the silver words were smaller, I chose to place them by hand - I was trying to be conservative with my vinyl.  It would have been easier to use one of the tutorials from Silhouette school to easily keep the spacing with the multiple colors, but since the silver bits were fairly small, and so spaced out, I didn't want to waste that much vinyl.  So I used my trusty transfer tape and measured (and double checked!) and placed the date, mr, mrs, and heart on my own. 
This was my first big project with vinyl and first using multiple colors.  I learned some new tricks and things I would do differently next time, but I'm super happy with how it turned out.
Can't wait to see what I can make next with my Cameo!

Want to Check Out More Silhouette Projects?

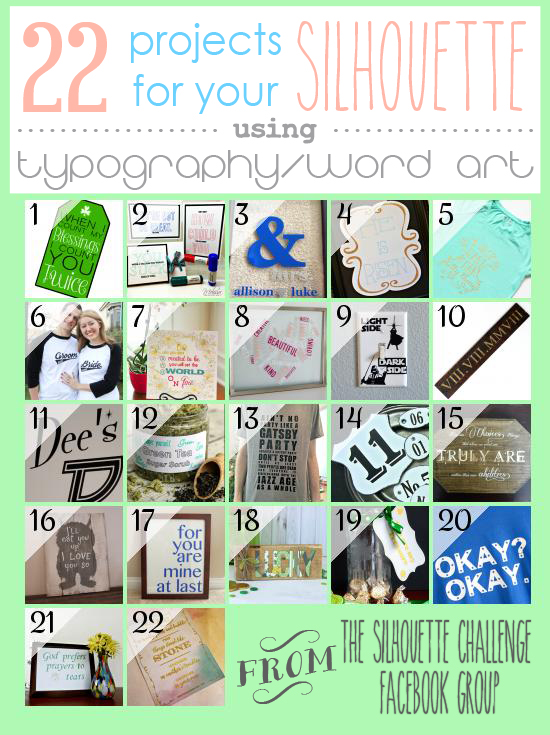
My Silhouette Challenge buddies and I are all sharing projects on our blogs today, so peruse the projects below for a wealth of Silhouette inspiration!
St. Patrick's Day Gift Tag with {FREE Cut File}The Fine PrintMr. and Mrs. Word ArtHe is Risen Easter Silhouette ArtDIY "Make Pretty Things" Graphic TeeBride & Groom Baseball ShirtsUsing Sketch Pens (and Markers!) For BeginnersHeart Shaped Vinyl Word ArtStar Wars Light Switch - Silhouette ChallengePallet Wood Roman Numeral Anniversary Signhow to cut LARGE Vinyl DecalsCreating Labels with Sketch Pens - March Silhouette ChallengeAin't No Party Like A Gatsby Party T-ShirtDIY Faux Enamel TagsHarry Potter Word ArtWhere the Wild Things Are Pallet Sign"At Last" Framed Vinyl Word ArtLucky Pallet SignSt. Patrick's Day Etched Glass Jar GiftThe Fault In Our Stars Inspired Shirt - Okay? Okay.Silhouette Craft Projects: Framed Irish ProverbSketch out an Inspiring Quote

1. My Paper Craze // 2. The Stamp Doc // 3. Peanut Life Adventures // 4. Creative Ramblings // 5. Pitter and Glink // 6. The Thinking Closet // 7. Single Yet Married Mom // 8. unOriginalMom // 9. Sisters, What! // 10. Where The Smiles Have Been // 11. From Whine to Whine // 12. Adventures in All Things Food // 13. Practically Functional // 14. Patina Paradise // 15. Please Excuse My Craftermath... // 16. Weekend Craft // 17. Two Purple Couches // 18. Ribbons & Glue // 19. TitiCrafty // 20. Simply Kelly Designs // 21. Confessions of an Overworked Mom // 22. Get Silvered


Linking up at some of these great parties!


Monday, January 12, 2015

Organize that Tupperware!

Happy New Year Everyone!  I am so excited to be back to blogging :)  How are your new year's resolutions going?  Is one of them to be more organized?
With the turn of the year, many people use this time to a fresh start and try to get more organized in their life.  Last year I shared with you a binder I made to organize my homemade birthday cards.  This year, I am sharing with you how I organized my baking cabinet.  It also happens to be part of the Silhouette Challenge and I am so excited to take part in my first challenge.  (Can I just say I love my Silhouette Cameo?!  I really do - it's been awesome to learn to use is the last several months and there are so many amazing projects out there.  I can't wait to share more of the cute things I have made, but those are posts for another day :)
So clearly I love to bake - if you know me or have been reading long, you will find many yummy treats on here.  Every good baker needs to have her supplies easily accessible.  One of the things I loved about my husband's house when we first got married was the space for my baking supplies - It was a serious treat after having things stuffed in odd places in my tiny galley kitchen in my apartment.

While I love my baking cabinet, it definitely needed a bit of a face-lift and some organization.  This project fit the bill and was a super simple one to tackle.
The first thing I did was measure the face of each of the different sizes of Tupperware I wanted to label.

Next I picked a font I liked (I used KC Lemonade - so fun!)  (second side note - KC Lemonade came from dafont.com) and typed out my labels in the Studio program.  The KC font was pretty good, but to be on the safe side, I did offset the text by .02, just to make it a tiny bit thicker and easier to cut out.
I double check my measurements, to make sure that everything would fit, then it was time to cut!  I used Oracle 651 vinyl and used the default cut settings in Studio for vinyl.  I also used my mat when I was cutting.  
Once everything was cut out, it was time to weed it out (get rid of all the parts of vinyl you don't want, leaving just your letters)
I didn't have any transfer tape at the time, so I used a lint roller sheet instead.  Place your transfer tape over your design, and use your scraper tool to get it to stick to your letters.  Then slowly peel the backing away.  Now place your letters on your Tupperware and use the scraper tool again to get the vinyl to adhere to your Tupperware.  


Repeat as needed for each label you made. 
Ta Da!  All neatly labeled.  Now I not forever confusing my flour and sugar at first glace.  


I love how my cabinet looks now too - all pretty and organized.


Thanks for stopping by!


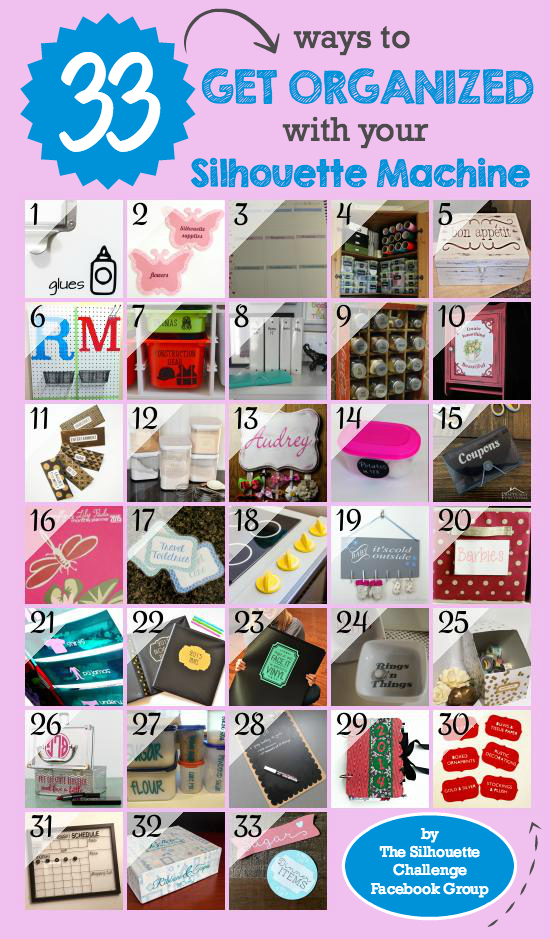
Want to Check Out More Silhouette Projects?

My Silhouette Challenge buddies and I are all sharing projects on our blogs today, so peruse the projects below for a wealth of Silhouette inspiration!

Organizing With Icons Butterfly Labels Customizing Your Erin Condren Life Planner Weekly Layout Organizing Your Craft Supplies with Labels Weekly Menu Box Peg Board Entry Way Order In Kid Land A Fun Way to Label Binders Sugar and Spice Looking Oh So Nice Turning a Plain Cabinet into Something Beautiful DIY Cash Budget Envelopes Flour and Sugar Pantry Container Labels Personalized Hair Bow Organizer Organize your Refrigerator DIY Vinyl Decorated Coupon Organizer 2015 Blog Planner Designed For Dragonfly & Lily Pads Laminated Labels with Your Silhouette The Secrets of How We Built Our DIY Play Kitchen Creative Way to Dry Winter Mittens Organizing Canvas Toy Bins with Labels Kids Closet Storage {with Rubbermaid Drawer Dresser and Vinyl Labels} Cute Gold Binder Labels {2015 Organization} Easy Vinyl Storage Organization and TWO Free Cut Files Personalized Ring Holders Upcycle for Organization Organizing Makeup with Style: A Monogrammed Makeup Case Vinyl Tupperware Labels How to Make a Chalkboard Clipboard Christmas Card Memory Book Simple DIY Holiday Storage Labels DIY Vinyl Frame Calendar with {FREE CUT FILE} Ribbons & Tapes Upcycled Organizing Box Print and Cut Pantry Labels
1. Please Excuse My Craftermath... // 2. Simply Kelly Designs // 3. Daily Dwelling // 4. Ginger Snap Crafts // 5. Our Southern Home // 6. Sowdering About // 7. The Moberg Family // 8. Decor Adventures // 9. Pineapples and Pinecones // 10. Patina Paradise // 11. The Thinking Closet // 12. It Happens in a Blink // 13. Adventures in All Things Food // 14. From Wine to Whine // 15. Practically Functional // 16. Dragonfly & Lily Pads // 17. unOriginal Mom // 18. One Dog Woof // 19. Creative Ramblings // 20. My Favorite Finds // 21. Create it. Go! // 22. A Prudent Life // 23. Where The Smiles Have Been // 24. Barb's Life // 25. Everyday Paper // 26. Pitter and Glink // 27. Peanut Life Adventures // 28. Feto Soap Blog // 29. Our Rosey Life // 30. Two Purple Couches // 31. My Paper Craze // 32. TitiCrafty // 33. Lil Mrs Tori


Wednesday, January 29, 2014

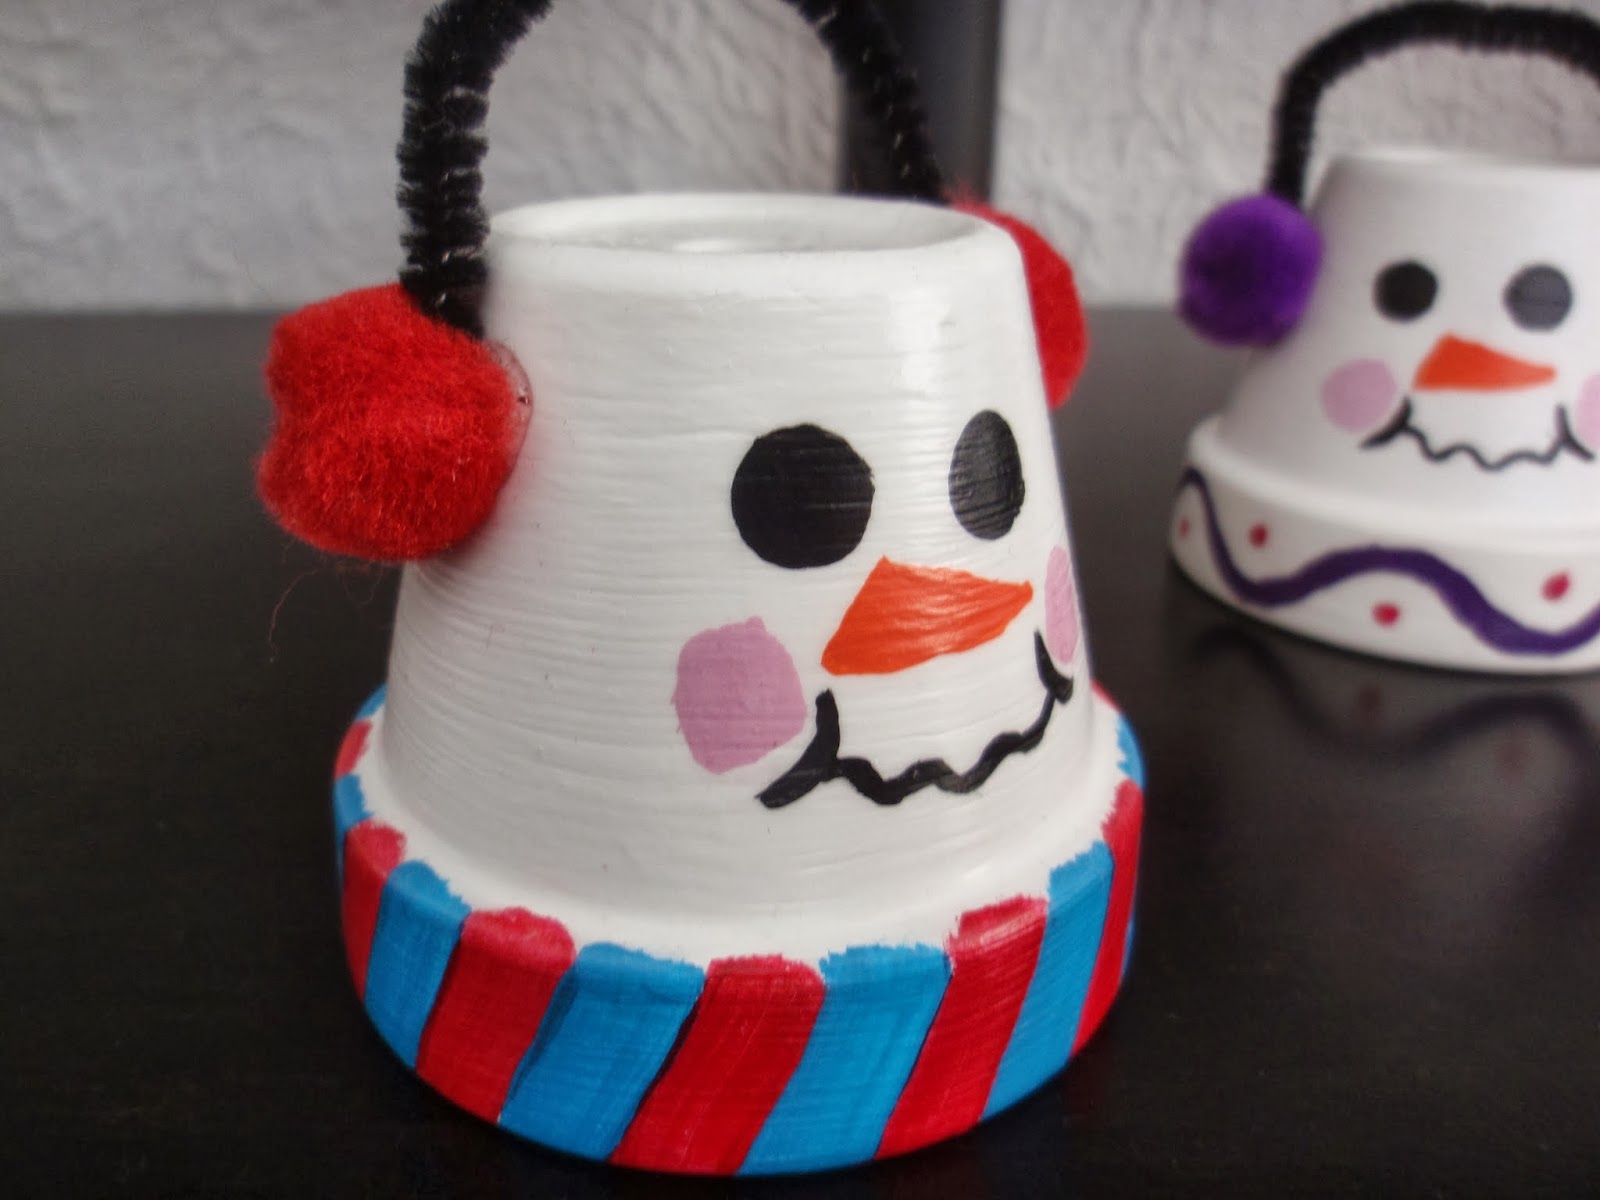
Clay Pot Snowmen

BRRR!  It sure has been cold here lately.  And by cold, I mean temperatures sometimes don't get above zeros and windchills are 40 or more below.  School has been canceled five times this month due to the dangerously cold weather - it's been crazy (and I still had to work those days, despite the kids getting off - boo - no extra craft or baking time for me).
Today I wanted to share a cute little craft I made awhile ago.  I apologize for not having a lot of pictures from the steps, but it's pretty basic, so hopefully you will be able to follow along.  Let me know if you have questions!


Snowmen Pots
What you Need:
  • Small clay pot
  • White, orange, pink, and black craft paint
  • Black Sharpie (optional)
  • Paintbrushes (both smaller and larger sizes)
  • Modge Podge
  • Small (1/2 inch) pom poms
  • Black pipe cleaner
  • Hot Glue Gun

What to Do:
Take your small clay pots and paint the outsides and bottom with white.  Let dry for 5-10 minutes and paint a second coat.  If necessary, add a third coat - you don't want any of the pot showing through.
Using a small paintbrush, draw on the face, eyes, cheeks, and nose.  If preferred, you can use the sharpie to draw the eyes and mouth on your snowman.  Using the pink and orange craft paint, add checks and a "carrot" nose.  Using a Q-tip can work great for making nice round "cheeks."
Once your face is on, seal your snowman with a light coat of modge podge.
For the scarf, you can either paint it on, use scrapbook paper and modge podge, or scraps of fleece fabric and the glue gun.
Finally, using the hot glue gun, attach the pom poms and pipe cleaner to create earmuffs.
Ta-Da!  You have a cute quick and easy winter decoration :)

Linking up at These Great Parties

Wednesday, January 22, 2014

DIY Camera Strap Cover

Today I have a super quick and simple sewing tutorial to share with you.  DSLR cameras are becoming very popular, but they are so boring and all look the same!  This quick little project will give you a chance to dress up your camera strap and make it your own.


What you need:

  • Two or more scraps of coordinating fabric
  • Interfacing
  • Iron
  • Thread to match


What to do:
First things first - measure your camera strap that you already have.  Mine was 1.5 inches wide and 21 inches long.  Double the width and add one (yes, I know, you need to do just a bit of math!), and add one inch to the length.  You can either your strap out of one piece of fabric or piece coordinating scraps together.  I pieced together fabric that was 4 inches wide (1.5 inches doubled is 3 inches plus one for seams and ease = four inches) and 22 inches long.
If you pieced your fabric together, iron the seams flat.
On both short ends, fold fabric over 1/4 inch and sew a hem.
Iron your interfacing onto the wrong side of the fabric. Interfacing should be the same width as your fabric and the length of your camera strap.

I know it's hard to see the hem on this picture, but it's there!  And don't place your interfacing over the hem
Fold right sides together, pin, and sew down the long open side.
Turn fabric right side out.
Place the seam in the middle and iron, seam side down.

Thread your camera strap through and enjoy your new (cooler) looking camera!


 Linking up:
Wednesday
Create and ShareSugar and SpiceWhat I Whipped UpWhatever Goes WednesdayShow me what ya GotWow me Wednesday{Wow Me} WednesdayCast PartyYour Whims WednesdayFluster's Creative MusterWednesday WhatsitShow and ShareDream to Reality, Wow Us Wednesday, A Little Bird Told Me, And Sew We Craft TogetherWe did it!, We Made that!, Two Girls and a Party
Thursday
Catch a GlimpseChic and CraftyThursday Favorite Things, Live Laugh LinkyCreative PrincessShare your Cup, , Blooming Linky PartyLink it UpMade you Look,  Blog StalkingWildly OriginalShowcase your TalentSomewhat SimpleKeep Calm and Link UpFive Little ChefsLamberts LatelyInspire Us Thursday, Weekly CreativeAll Things Pretty
Friday
Show and Tell FridayFriday Favorites,Lovely Crafty WeekendWeekend WanderWeekend Bloggy ReadingFlaunt it Friday504 MainFriday FavsFancy This Friday, Flash Blog Friday, Finished FridayFreedom FridayShow off Friday, Keep Calm and Link Up, Weekend Wonders, I'm loving it, Friday FavsPity Party, Dare to Share, F Friday, Craftionary Link Party, Do Something Crafty, Get CraftyShine on Friday!
Weekend
Weekend Wrap UpStrut Your StuffCheck me Out Show and TellSaturday SpotlightYour Great IdeaShare it SaturdaySunday ShowcaseThink PinkNifty Thrifty SundayNot Baaad SundayThat DIY Party,  A Bouquet of TalentWeekend Creative

Monday

Wednesday, January 8, 2014

Birthday Card Organizer

Welcome to 2014!  I can't believe we're already into January.  I know many people have set organization goals for themselves for the year, and I wanted to share a quick tutorial with you to help you stay organized and make sure you don't forget any birthday's this year!
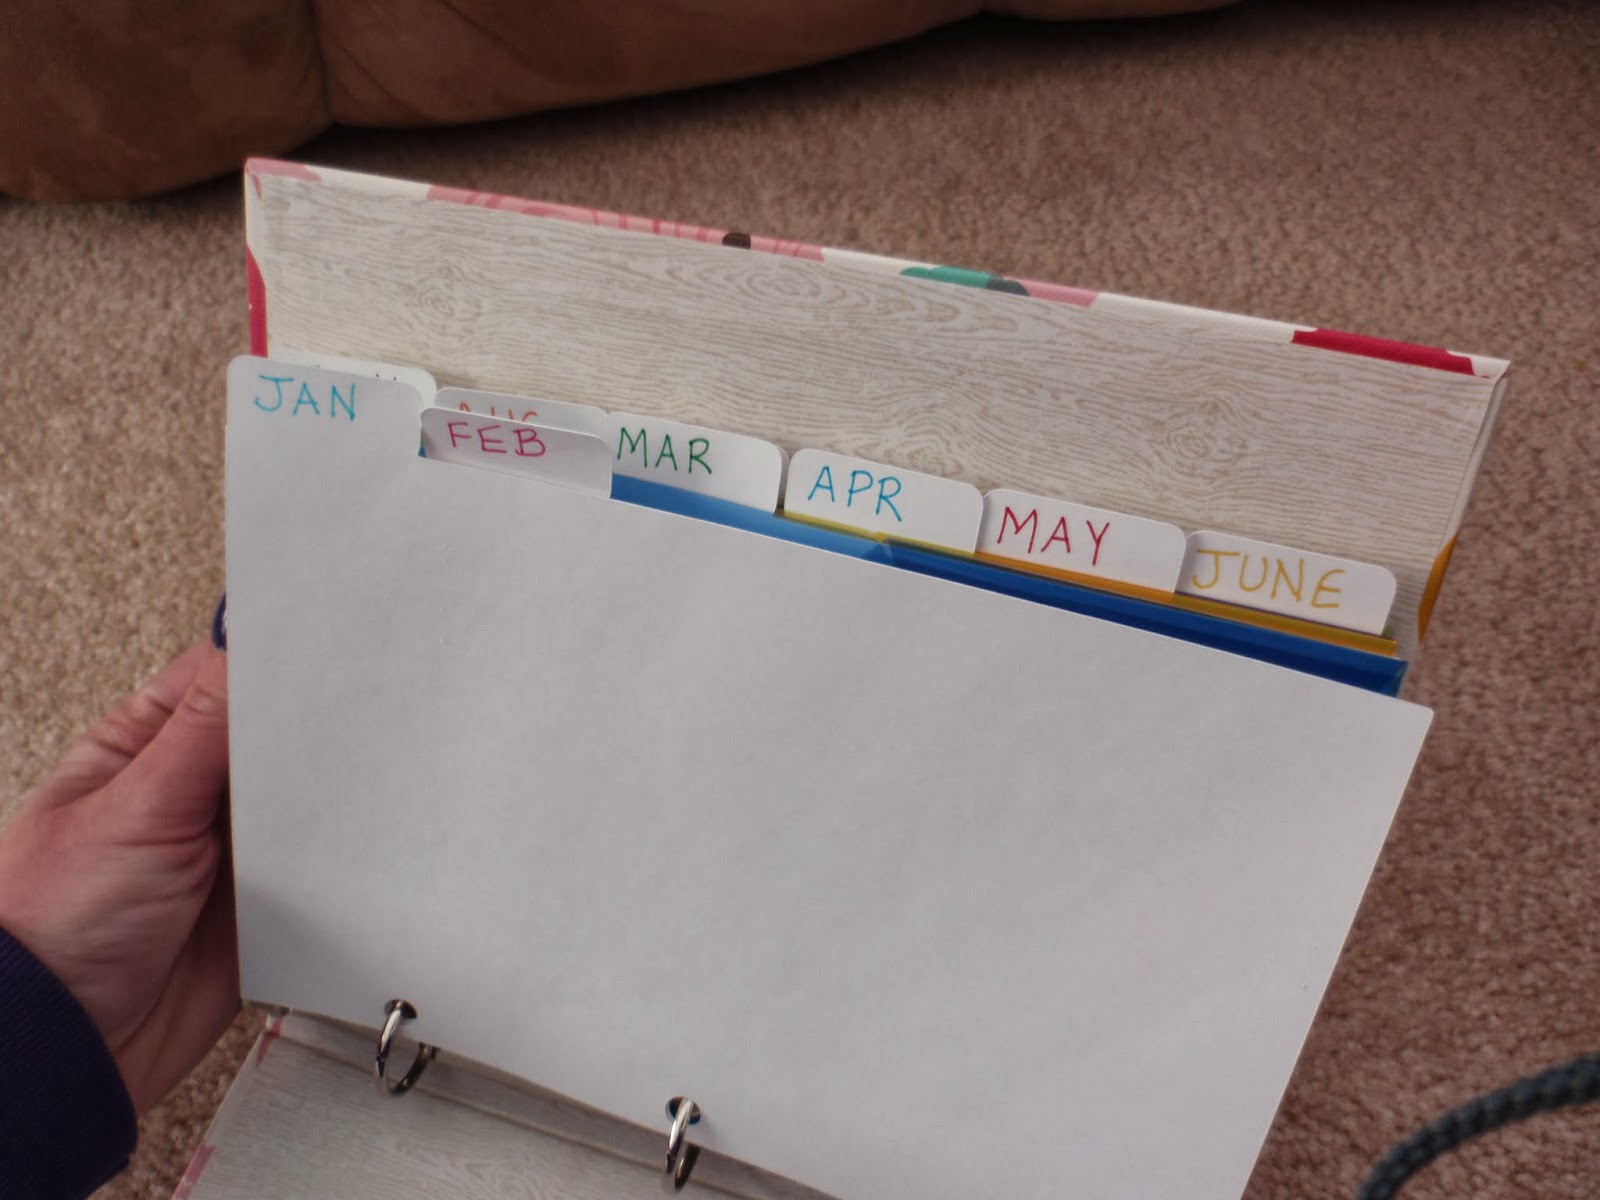
I've recently gotten into card-making (stay tuned for more posts on this!) and one thing I wanted to do was make handmade cards for all of my friends and family this year.  I like to plan ahead and put forth my best effort, and not be rushing to finish a card on the day I have to mail it.  So I decided to make a birthday card organizer so that when I have time, I can make my cards for the next few months and then they will be all organized and ready to go when they need to go in the mail!
What you Need:
  • Mini Binder (I got mine at Target)
  • Avery Mini binder folders (2 packets of 5) or Mini sheet protectors
  • 12 sheets of cardstock
  • Post it notes
  • Optional - cutting machine like Cricut or Silhouette

What to Do:
This project is really pretty simple.
Using your cardstock, you are going to cut out tabs/dividers.  Hole punch and label them for each month.
You can either cut out the tabs and hole punch them by hand (just trace around them to create your own template).  Alternatively, you can use a Cricut or Silhouette to cut them out for you.  I got a Silhouette in their After Thanksgiving Sale and I love it!  This is my first big project with it and I'm so happy with how it turned out!  I designed my own set of six tabs for mini binders with three holes.
Use post it notes to write out holidays or birthdays for each month.
Place the Avery folders behind the tabs and there you go!  You can plan out your next few months of card giving and keep them all together so you are prepared when holidays or birthdays come up!  Place your cards in the folders and you'll be all ready and make sure to not forget a birthday! 
If cardmaking is not your thing, you can also create this and use it to store bought cards instead.
One thing to note, the folders only come in packs of five.  It works out fine for me, since I have two months where there are not birthdays, so it's fine for me.

If anyone can tell me how to save and share the silhouette cutting file or turn it into a free SVG file, I'd be happy to share the mini binder tabs I designed!
*Note, I think I can e-mail the Silhouette cutting file I made - e-mail me if you would like it!

Edit - Click here to get the download for mini binder tabs.

Good luck with getting organized for 2014!  Have a great week!

 Linking up:
Wednesday
Create and ShareSugar and SpiceWhat I Whipped UpWhatever Goes WednesdayShow me what ya GotWow me Wednesday{Wow Me} WednesdayCast PartyYour Whims WednesdayFluster's Creative MusterWednesday WhatsitShow and ShareDream to Reality, Wow Us Wednesday, A Little Bird Told Me, And Sew We Craft TogetherWe did it!, We Made that!, Two Girls and a Party
Thursday
Catch a GlimpseChic and CraftyThursday Favorite Things, Live Laugh LinkyCreative PrincessShare your Cup, , Blooming Linky PartyLink it UpMade you Look,  Blog StalkingWildly OriginalShowcase your TalentSomewhat SimpleKeep Calm and Link UpFive Little ChefsLamberts LatelyInspire Us Thursday, Weekly CreativeAll Things Pretty
Friday
Show and Tell FridayFriday Favorites,Lovely Crafty WeekendWeekend WanderWeekend Bloggy ReadingFlaunt it Friday504 MainFriday FavsFancy This Friday, Flash Blog Friday, Finished FridayFreedom FridayShow off Friday, Keep Calm and Link Up, Weekend Wonders, I'm loving it, Friday FavsPity Party, Dare to Share, F Friday, Craftionary Link Party, Do Something Crafty, Get CraftyShine on Friday!
Weekend
Weekend Wrap UpStrut Your StuffCheck me Out Show and TellSaturday SpotlightYour Great IdeaShare it SaturdaySunday ShowcaseThink PinkNifty Thrifty SundayNot Baaad SundayThat DIY Party,  A Bouquet of TalentWeekend Creative

Monday

Wednesday, December 4, 2013

10 Handmade gifts in an afternoon

We have officially passed Thanksgiving and now many thoughts turn towards the winter holiday season.  Many times handmade Christmas or Holiday gifts need a ton of planning and need to be started months in advance.  But not the ones listed below!  These can all easily be made in an afternoon or some evening after work.
Handmade gifts are generally much cheaper than store bought ones and don't have to be cheesy or look homemade.  Many people greatly appreciate the time and effort it took to make something homemade.  So give it a go!  Try your hand at some homemade gifts this year!
If you have any questions about any of the projects, please let me know!

1. Painted Picture Frame
This simple project can be done in less than an hour, easily.  These make great presents for best friends or loved ones.  Wouldn't grandma and grandpa love a picture of them with their grandchildren in a decorated frame?  Or even for your significant other to put on their desk at work.  I have made several of these over the years and they have been a big hit. 

2. Hooded Towel
I have now made 3 different hooded towels for baby shower gifts.  I love love love to make them.  They always take a little longer than I anticipate, but they can certainly be easily finished in an afternoon (even with a break!).  I have made a penguin, a ladybug, and a dragon (post on that one will be up next week).  These would make great gifts for babies or toddlers.  Or use a bigger towel to make one for a bigger person :)

3. Gift Card Holder
Sometimes you are at a loss at what to give someone and you want to go the easy route with a gift card.  Dress up that gift card with this gift card holder!  It's perfect for storing gift cards, business cards, or store loyalty cards.  You probably have everything you need right in your sewing bin and it's easy to customize to the person you are giving to by using their favorite colors.  Make a gift card a little more personal by giving it in a homemade gift card holder!

4. Stamped Notepads
Who doesn't need a notepad to keep track of all the busy thoughts in your head.  Using the directions in this post, you will see how quick an easy it is to make a notepad for someone you love.  Use their favorite colored paper or a cute stamp set to make a personalized notepad.

5. Card Set

Letter writing may be a lost art, but cardmaking is making a huge comeback.  You don't need a ton of special supplies to make cards.  In fact, you can use some simple paper and stamps and turn out beautiful cards.  If you have a few more supplies and want to try your hand at embossing to make some fancier cards - go for it!  Thank you notes or blank note cards can always be put to good use. 

6. Placemats
http://peanutlifeadventures.blogspot.com/2013/11/placemats.html
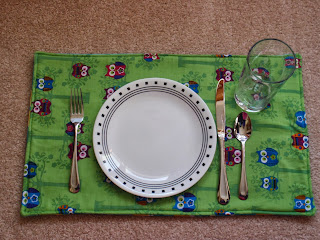
I did in fact, make these placemats for a gift this fall.  I love the ability of homemade gifts to fit the person getting them.  I knew I wanted to do something with owls for my dear friend, so I found some fun owl material and made her some cute placemats.  Fun but practical!  Make some personalized holiday ones, or ones that can be used all year.  Super simple to make - just four straight lines and a simple pattern!

7. Pincushion
This project truly can be completed in less than 30 minutes, and can be make from leftover fabric and ribbon.  If you have a crafty friend, make a pincushion for them that they can tie onto their sewing machine!

8. Photo Coasters
If you are a budding photographer, showcase some of your favorite prints by making them into a coaster set.  Or you can use family snap shots for mom and dad or grandparents.  These are super simple to make - give them a try!

9. Reversible Headband
One of my favorite projects and so quick and simple to make.  These reversible headbands would make a great stocking stuff or small add-on in a present.  Easily customizable using a favorite fabric or color.  These are so easy to make, you can make a pair in less than an hour!

10. Quick and easy dischloth
My final idea for you are these quick and easy discloths.  Pop in your favorite Christmas movie and get out your needles and yarn.  By the time the movie is over, you will have a handmade dishcloth ready for gifting.  These make great hostess gifts for someone having a holiday party.  They are also a great gift for any young couple.  


I hope you enjoy these ideas and they get your creative juices flowing.  If you have any questions, please let me know.  Happy Holiday Season!

Linking up:
Wednesday
Create and Share, Sugar and Spice, What I Whipped Up, Whatever Goes Wednesday, Show me what ya Got, Wow me Wednesday, {Wow Me} Wednesday, Cast Party, Your Whims Wednesday, Fluster's Creative Muster, Wednesday Whatsit, Show and Share, Dream to Reality, Wow Us Wednesday, A Little Bird Told Me, And Sew We Craft Together, We did it!, We Made that!, Two Girls and a Party
Thursday
Catch a Glimpse, Chic and Crafty, Thursday Favorite Things, Live Laugh Linky, Creative Princess, Share your Cup, , Linky Party, Link it Up, Made you Look, Inspiration in Progress, Blog Stalking, Wildly Original, Showcase your Talent, Somewhat Simple, Keep Calm and Link Up, Five Little Chefs, Lamberts Lately
Friday
Show and Tell Friday, Friday Favorites, Simply Create, Lovely Crafty Weekend, Weekend Wander, Weekend Show Off, Weekend Bloggy Reading, Flaunt it Friday, 504 Main, Friday Favs, Fancy This Friday, Flash Blog Friday, Finished Friday, Freedom Friday, Show off Friday, Happy Hour, Keep Calm and Link Up, Weekend Wonders, I'm loving it, Friday Favs, Pity Party, Dare to Share, F Friday, Craftionary Link Party, Do Something Crafty, Get Crafty, Shine on Friday!
Weekend
Weekend Wrap Up, Saturday Spotlight, Strut Your Stuff, Check me Out , Show and Tell, Saturday Spotlight, Your Great Idea, Simply Sweet Saturday, Share it Saturday, Saturday Show and Tell, Craft Create Inspire, Sunday Showcase, Think Pink, Nifty Thrifty Sunday, Not Baaad Sunday, That DIY Party, Overflowing with Creativity Party, A Bouquet of Talent, Weekend Creative

Monday
Related Posts Plugin for WordPress, Blogger...