So I got a sewing machine after my wedding in October, cool right? I went out and looked for the supplies I needed - pins and thread and tape measure and scissors. I was all set and got right to work sewing away on small projects. It's been lots of fun!
Clearly, however, I forgot a very important item - a pincushion! I'm trying to be very good about pinning my projects in an effort to sew straight lines and avoid bumps and wrinkles... but then I need somewhere to put those pins. Enter a quick search on Pinterest and some leftover fabric from my bike bag and problem solved! (and another Project 14 project completed!) A pincushion that is tied onto my sewing machine so I never lose it!
Materials needed:
Basic sewing supplies
Approx 3 feet of ribbon (enough to wrap around your sewing machine 1 1/2 to 2 times)
Scrap Fabric
Stuffing/Polyester fill/Batting scraps
Directions:
Cut two rectangles of fabric, 5 inches by 3 inches. (or whatever size will best fit on your sewing machine, depending how it is laid out)
Measure your ribbon around your sewing machine. Cut two pieces that are long enough to go around your sewing machine.
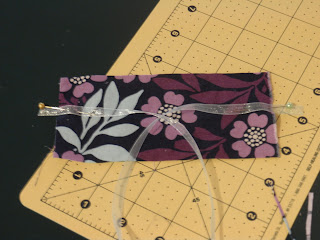
Lay one of the pieces of fabric right side up and place your ribbon on the edges, leaving a little extra hang over the edge. Pin to hold in place.
Place right sides together and pin around
Sew around all four sides, leaving about a 3 - 4 inch opening along the bottom for turning.
Be careful not to sew over the long ends of the ribbon. However, I did reinforce stitch, by going back and forth twice, on the short sides to make sure the ribbon will stay put!
Turn it right side out and stuff it (the more stuffing the better)
Then top stitch (or hand stitch) the opening closed
There you have it, just tie it on and you are good to go!
See, isn't it great, it can even slide to the underside to tuck away when I want to put the cover on!
Linking up
Wednesday
Create and Share, Sugar and Spice, What I Whipped Up, Whatever Goes Wednesday, Show me what ya Got, Lil Luna, Wow me Wesdnesday, {Wow Me} Wednesday, Cast Party, Your Whims Wednesday, Fluster's Creative Muster, Wednesday Whatsit, Show and Share, Dream to Reality, Wow Us Wednesday, Super Linky Party, What We Wore, Read, and Made, Whatcha Work-Up, A Little Bird Told Me, And Sew We Craft Together, We did it!, We Made that!, Two Girls and a PartyThursday
Hooking up with HoH, Catch a Glimpse, Creative Juice, Chic and Crafty, Thursday Favorite Things, Live Laugh Linky, Creative Princess, Share your Cup, , Linky Party, Link it Up, Made you Look, Inspiration in Progress, Blog Stalking, Wildly Original, Showcase your Talent, Somewhat Simple, Keep Calm and Link Up, Five Little Chefs, Commercial Break, Lamberts Lately
Friday
Show and Tell Friday, Friday Favorites, Simply Create, Lovely Crafty Weekend, EBKTS, Weekend Wander, Weekend Show Off, Weekend Bloggy Reading, Flaunt it Friday, 504 Main, Friday Favs, Fancy This Friday, Flash Blog Friday, Finished Friday, Freedom Friday, Show off Friday, Happy Hour, Keep Calm and Link Up, Weekend Wonders, I'm loving it, Fiday Favs, Pity Party, Dare to Share, F Friday, Craftionary Link Party, Do Something Crafty, Get Crafty, Shine on Friday!
Weekend
Weekend Wrap Up, Say G'day, Saturday Spotlight, Strut Your Stuff, Check me Out , Show and Tell, Saturday Spotlight, Your Great Idea, Simply Sweet Saturday, Share it Saturday, Saturday Show and Tell, No Rules Blog Party, Craft Create Inspire, Sunday Scoop, Sunday Showcase, Think Pink, Nifty Thrifty Sunday, Not Baaad Sunday, That DIY Party, Overflowing with Creativity Party, A Bouquet of Talent, Weekend Creative
Monday
A Round Tuit, Masterpiece Monday, Market Yourself Monday, Pink Hippo Party,Motivate Me Monday, Made by You Mondays, Made with Love, Craft-O-Manic Monday, Monday Funday, Sweet Sharing Monday, Marvelous Mondays, Make it Pretty, Mop It Up Monday, Busy Monday, I gotta try that, Mad Skills
Tuesday
Anti-Procrastination Tuesday, Homemade Tuesday, Nifty Thrifty Tuesday, Take a Look Tuesday, Too Cute Tuesday, One Project at a Time, Tasteful Tuesday, Tell me Tuesday, Trick or Treat Tuesday, Whatcha Whipped Up, Tuesday Talent Show, Two Cup Tuesday, Memories by the Mile, Totally Tasteful Tuesdays, Tuesday Confessional, Time for You Tuesday, Gathering Spot, Take it On Tuesday, You're Gonna Love it Tuesday, All my Bloggy Friends, Tuesday to Do, Pin it Tuesday


Great idea! That is the perfect location for a pin cushion.
ReplyDeleteThis is my exact problem! What a perfect solution with the ribbon!!
ReplyDeleteCould also be attached using the stick on Velcro on the machine, and the sew on velcro on the pincushion before sewing the two pieces together. That way if you are pinning away from the machine you can take the pin cushion with you.
Deletethis is a great idea and is similar to what seamstresses used back in the "good old days". the downside is that unless you are very very careful, the pins will scratch and ruin the finish.
Deletesara
This is in response to Sara. I, too love this little project, and I was wondering if perhaps to keep the pins from scratching the surface we could insert strong cardboard or something similar to the backside of the cushion to keep the pins from going through? I’ve just now read your pattern so 8 haven’t tried it yet. I’ll just have to try something! Love love this little pincushion!
DeleteI also very much like this idea. I'm thinking a fine mesh plastic canvas or a small piece of template plastic might help protect the machine. I will have to try it.
DeleteLovely and practical pincushion!Love the simple idea!Thanks for sharing!
ReplyDeleteEnjoy your day!
Hugs from Portugal,
Ana Love Craft
www.lovecraft2012.blogspot.com
Ok, I don't sew a lot, but this is genius! Will have to make one of these!
ReplyDeleteI have the same sewing machine and love it!
ReplyDeleteThanks! Glad to hear you like it too :)
DeleteThis is a great idea. I've got to replicate it.
ReplyDeleteThanks for sharing with us at our Thursday Favorite Things Blog Hope.
Angel @ sewcraftyangel.blogspot.com
I love your fabric - and the ribbon to hold it in place is a nice touch :)
ReplyDeleteWhat a great idea. Love it!
ReplyDeleteLooks great! Stopping by from the Super Sunday link party.
ReplyDeleteHow brilliant to have your pincushion attached to your sewing machine! Thanks for sharing at Inspire Us Thursday at Organized 31.
ReplyDeleteHow clever!! So glad you linked up at Romance on a dime again. Hope to see you this Tuesday!
ReplyDeleteO.k, I have to tell you that I have quite a large pin cushion collection. But yet, I do not have one tied to my machine. Clever idea and I think I may just need to make one more. lol! Thanks for sharing with SYC.
ReplyDeletehugs,
Jann
This is too cute and I think I could make it too, lol. Thanks for sharing at Mix it up Monday :)
ReplyDeleteWhat a great idea! So cute and convenient!
ReplyDeleteIF YOU STUFF THIS WITH STEEL WOOL, EVERYTIME YOU PUT IN A PIN, IT WILL SHARPEN IT.
ReplyDeleteSo simple yet absolutely brilliant.
ReplyDeleteBrilliant idea,awasome.
ReplyDeleteBrilliant idea,awasome.
ReplyDeleteMy mother had Pieces of felt attached to the top of her 1960's sewing machine. I didn't know pin cushions went anywhere else when I watched her sew my Halloween costumes in the 70's! I sew a lot now. My pin cushion gets lost under all my stuff. Thank you for the reminder of where it really belongs! And a better design than just pieces of felt! :) Paris in Mass
ReplyDeleteI just made this! I used bias tape because I didn't have ribbon and stitched Velcro on the ends. It fits on all sides of my machine! Love it!
DeleteI made this and used decorative elastic and fed it in under my needle. I love this idea, thanks. My pins are right where I need them.
ReplyDeleteGreat idea. I have an older New Home machine HD that I can actually use a magnet for mine. Thanks
ReplyDeleteGreat idea. I have an older New Home machine HD that I can actually use a magnet for mine. Thanks
ReplyDeleteIf you stuff polyester fill around the steel wool it will be more finger-friendly and still sharpen your pins.
ReplyDeleteExcellent project. Great comments. Will make this.
ReplyDeletelove it
ReplyDeleteI am making a few of these. The steel wool idea is an upgrade.
ReplyDeleteI made a couple of these just like you made but when I added the ribbon I couldn't tie it on my machine because of autherites so I added velcro to the ends and it worked out great. Thank You!!!!! PS. I like the idea of the steel wool so i am going to make a few of these . I had 4 sewing machines as of last weekend had a garage sale sold 2 , my neiboer has a singer and she gave it to me so i am going over today and pick it. Now i will have a dial & sew a Disney Brother that I love and now an old singer just like the one my Mom had . Thank you Bunches :) Love your Projects:)
ReplyDeleteI was thinking instead of the ribbon, to use self-stick velcro. One piece on the machine and one on the pin cushion.
ReplyDeleteLove the idea! I made one in a red and white heart shape with double sided sponge tape.
ReplyDeleteAnd that's the machine we use in our house, we have three! Love Brothers.
Such a cute little gift idea. I know just the person to make it for! Thank you for sharing.
ReplyDeleteCertification in Color therapy
ReplyDeleteJoin thousands of successful practitioners & elevate your wellness journey!
Ready to Become Color Therapy Practitioner
Learn how to treat 100+ conditions
Learn How to Safely & Effectively Use Color Therapy for Health
Buy now for ₹799 - Master Color Therapy Technique