Wednesday, January 29, 2014

Clay Pot Snowmen

BRRR!  It sure has been cold here lately.  And by cold, I mean temperatures sometimes don't get above zeros and windchills are 40 or more below.  School has been canceled five times this month due to the dangerously cold weather - it's been crazy (and I still had to work those days, despite the kids getting off - boo - no extra craft or baking time for me).
Today I wanted to share a cute little craft I made awhile ago.  I apologize for not having a lot of pictures from the steps, but it's pretty basic, so hopefully you will be able to follow along.  Let me know if you have questions!
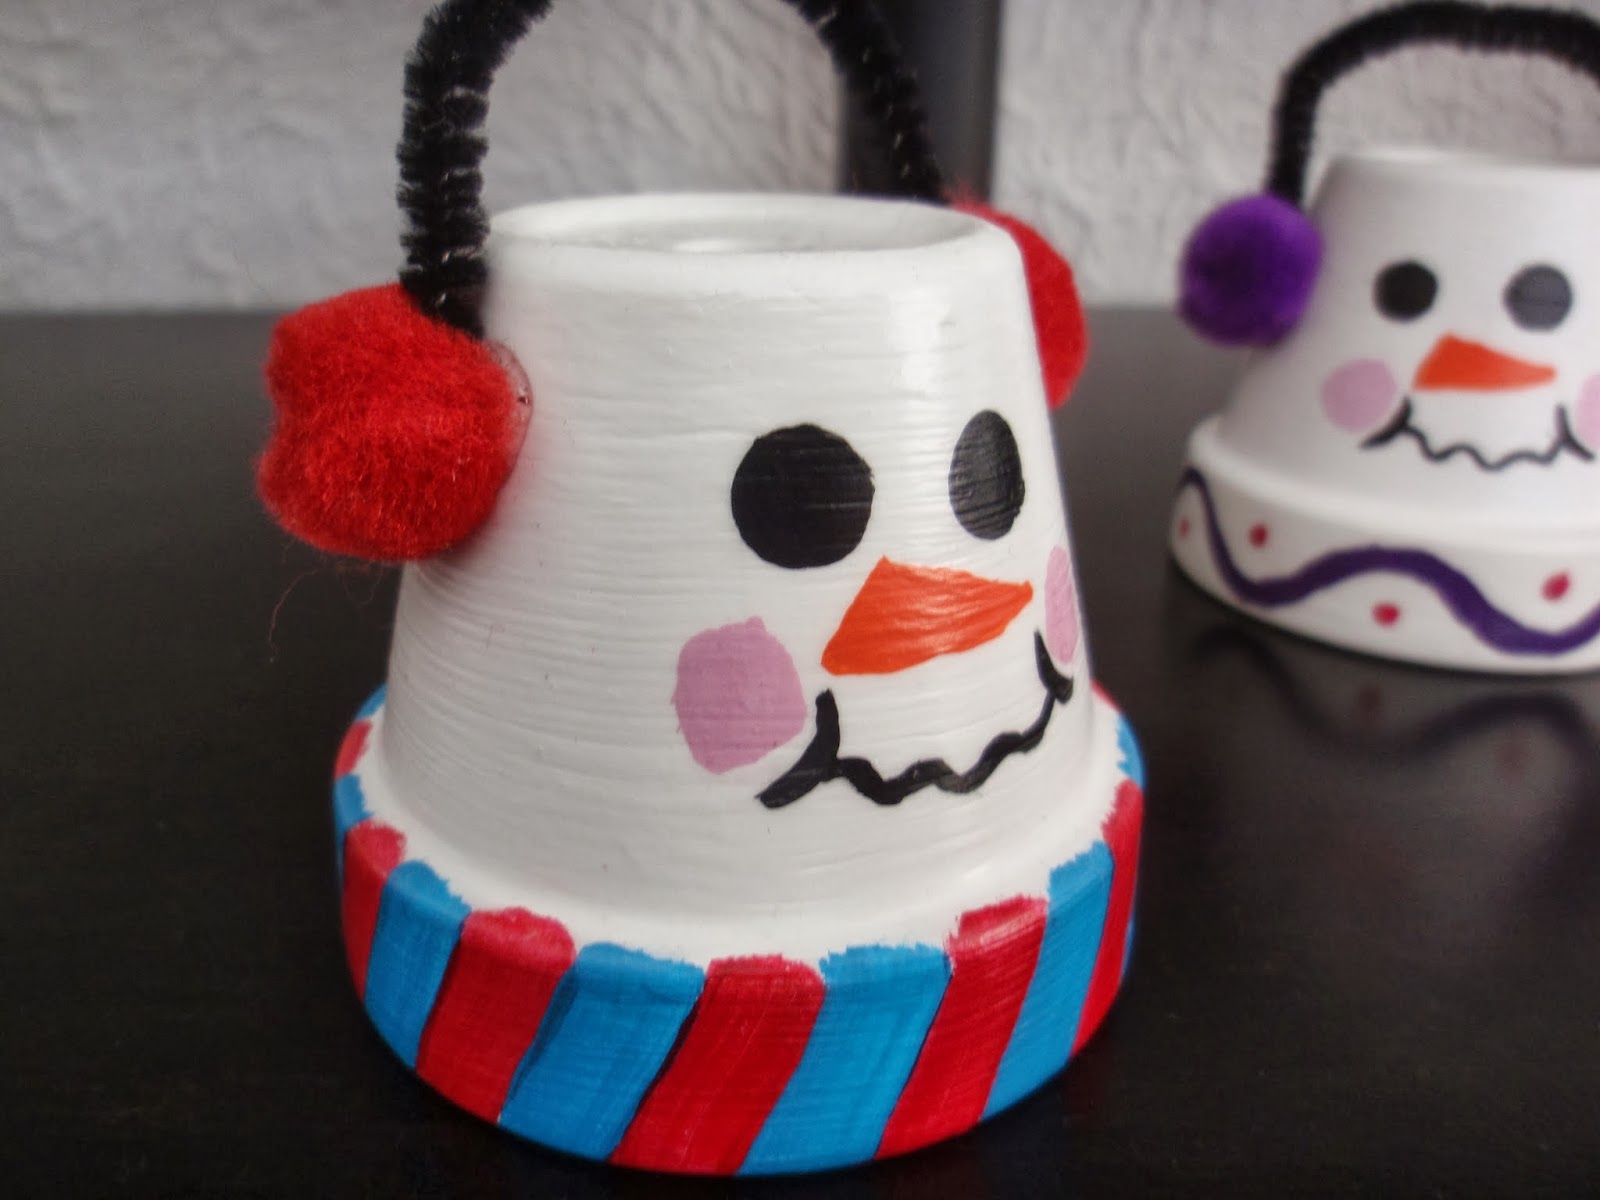

Snowmen Pots
What you Need:
  • Small clay pot
  • White, orange, pink, and black craft paint
  • Black Sharpie (optional)
  • Paintbrushes (both smaller and larger sizes)
  • Modge Podge
  • Small (1/2 inch) pom poms
  • Black pipe cleaner
  • Hot Glue Gun

What to Do:
Take your small clay pots and paint the outsides and bottom with white.  Let dry for 5-10 minutes and paint a second coat.  If necessary, add a third coat - you don't want any of the pot showing through.
Using a small paintbrush, draw on the face, eyes, cheeks, and nose.  If preferred, you can use the sharpie to draw the eyes and mouth on your snowman.  Using the pink and orange craft paint, add checks and a "carrot" nose.  Using a Q-tip can work great for making nice round "cheeks."
Once your face is on, seal your snowman with a light coat of modge podge.
For the scarf, you can either paint it on, use scrapbook paper and modge podge, or scraps of fleece fabric and the glue gun.
Finally, using the hot glue gun, attach the pom poms and pipe cleaner to create earmuffs.
Ta-Da!  You have a cute quick and easy winter decoration :)

Linking up at These Great Parties

Monday, January 27, 2014

M&M Cookie Bars

I know I know, we are still in January and most people are still working super hard on their New Year's resolutions to eat healthy.  I fully support that.  But I can't resist making some delicious desserts.  My husband certainly doesn't complain!  I don't know where he puts all the cookies and sweet treats he eats, but he's as skinny as ever.  He's always happy to be my taste-tester anytime I ask.

A the beginning of the month, we traveled to Madison to visit some close friends.  I was crazy busy with returning to work after the holidays, but I still wanted to make something to take with us to share.  I had some leftover holiday M&Ms and found this recipe on Pinterest.

 
Enter these M&M Cookie Bars.  The thing I love about cookie bars is they are quick and easy to make!  No rolling out dough, no cleaning up multiple cookie sheets/silicone mats/cooling racks.  One bowl to mix in and one pan to bake in and your done.

M&M Cookie bars
Recipe Adapted from I <3 Naptime

Ingredients:
  • 12 Tablespoons (1 1/2 sticks) butter
  • 3/4 cup sugar
  • 3/4 cup brown sugar
  • 2 eggs
  • 1 teaspoon vanilla
  • 2 cups flour
  • 1/2 teaspoon baking soda
  • 1/2 teaspoon baking powder
  • 2 cups M&Ms divided
Directions:
In the bowl of a stand mixer (or any mixing bowl), cream the butter, sugar, brown sugar, eggs, and vanilla.  Mix for at least 1 minute.  Add in the baking soda, baking powder, and slowing incorporate the flour.  Mix in  1 1/4 cups of M&Ms.


You can bake these two ways.  The original directions call for baking on a 9x13 pan lined with foil.  That is what I did the first time I made these.  I think it would be easier to use a glass pan, sprayed with cooking spray, and forgo the foil.  Your choice - use whatever sounds easiest to you!
Spread out the mixture in the pan as best you can.  It will be very sticky.  It's ok if it is not level and not in all corners of the pan as it will spread out as it bakes.
Sprinkle the remaining M&Ms over the top

Bake at 325 degrees for 25-35 minutes.  Or until a toothpick comes clean (this took nearly 40 minutes for me - make sure you check this!  I know it's easy to want to skip this step, but you want to make sure all of your bars are cooked through!)

Let cool for five minutes then slice while still slightly warm (it makes slicing a whole lot easier!)
Eat fresh or store in an airtight container.

Enjoy! 
 

<-- Click here for nutritional information and a printer friendly version!


Wednesday, January 22, 2014

DIY Camera Strap Cover

Today I have a super quick and simple sewing tutorial to share with you.  DSLR cameras are becoming very popular, but they are so boring and all look the same!  This quick little project will give you a chance to dress up your camera strap and make it your own.


What you need:

  • Two or more scraps of coordinating fabric
  • Interfacing
  • Iron
  • Thread to match


What to do:
First things first - measure your camera strap that you already have.  Mine was 1.5 inches wide and 21 inches long.  Double the width and add one (yes, I know, you need to do just a bit of math!), and add one inch to the length.  You can either your strap out of one piece of fabric or piece coordinating scraps together.  I pieced together fabric that was 4 inches wide (1.5 inches doubled is 3 inches plus one for seams and ease = four inches) and 22 inches long.
If you pieced your fabric together, iron the seams flat.
On both short ends, fold fabric over 1/4 inch and sew a hem.
Iron your interfacing onto the wrong side of the fabric. Interfacing should be the same width as your fabric and the length of your camera strap.

I know it's hard to see the hem on this picture, but it's there!  And don't place your interfacing over the hem
Fold right sides together, pin, and sew down the long open side.
Turn fabric right side out.
Place the seam in the middle and iron, seam side down.

Thread your camera strap through and enjoy your new (cooler) looking camera!


 Linking up:
Wednesday
Create and ShareSugar and SpiceWhat I Whipped UpWhatever Goes WednesdayShow me what ya GotWow me Wednesday{Wow Me} WednesdayCast PartyYour Whims WednesdayFluster's Creative MusterWednesday WhatsitShow and ShareDream to Reality, Wow Us Wednesday, A Little Bird Told Me, And Sew We Craft TogetherWe did it!, We Made that!, Two Girls and a Party
Thursday
Catch a GlimpseChic and CraftyThursday Favorite Things, Live Laugh LinkyCreative PrincessShare your Cup, , Blooming Linky PartyLink it UpMade you Look,  Blog StalkingWildly OriginalShowcase your TalentSomewhat SimpleKeep Calm and Link UpFive Little ChefsLamberts LatelyInspire Us Thursday, Weekly CreativeAll Things Pretty
Friday
Show and Tell FridayFriday Favorites,Lovely Crafty WeekendWeekend WanderWeekend Bloggy ReadingFlaunt it Friday504 MainFriday FavsFancy This Friday, Flash Blog Friday, Finished FridayFreedom FridayShow off Friday, Keep Calm and Link Up, Weekend Wonders, I'm loving it, Friday FavsPity Party, Dare to Share, F Friday, Craftionary Link Party, Do Something Crafty, Get CraftyShine on Friday!
Weekend
Weekend Wrap UpStrut Your StuffCheck me Out Show and TellSaturday SpotlightYour Great IdeaShare it SaturdaySunday ShowcaseThink PinkNifty Thrifty SundayNot Baaad SundayThat DIY Party,  A Bouquet of TalentWeekend Creative

Monday

Monday, January 20, 2014

Crockpot Chicken Noodle Soup

Hello Again! 
Last week was the end of the semester at my school, it was a CRAZY busy time!  So glad that the week is over (and that I get today off!  Yay for catching up on chores, (and fingers crossed for some craft time!).  This week will be a busy one for me again, and I won't have much time for cooking.  The so-called polar vortex is supposed to reappaer for the majority of the week.  I am not a fan of high temperatures that start with a - sign.  That's too cold even for me!  
At the end of a long busy (cold!) day, I don't usually feel like cooking  But I do want a warm meal that will be hearty and delicious.  Enter CrockPot Chicken Noodle Soup.  Throw it in the crock pot in the morning, let it simmer all day while you are at work.  Add some noodles when you get home and you have a delicious healthy meal with very little effort on your part, and one that will warm you from the inside out.  Pair with some 30 minute rolls and you have a perfect meal with hardly any work on your part - Win!


Crockpot Chicken Noodle Soup
Ingredients:
  • 2 lbs of chicken 
  • 1 lb carrots
  • 2 cups celery
  • 1/2 medium onion
  • 6 cups of chicken broth (6 cups hot water plus 4 teaspoons chicken bullion)
  • 12 oz egg noodles (3/4 bag)

Directions:
Chop all of the vegetables and place in the crockpot.  Add the chicken on top.  If your chicken is frozen (or partially so) you can put it in whole.  Otherwise, cute into 1 inch chunks.  Pour broth over the top.  Turn crockpot on to low, and cook for 6-8 hours.  
Stir contents of crock pot.  If you placed the chicken in whole, use spoon or knife to break up the chicken into smaller pieces.  By this time, the chicken should be very tender and fall apart easily.
Add the egg noodles over the top and cook for an additional 30-60 minutes.  If needed, add some more water to the crock pot.  You want the noodles to be mostly submerged or they will get crunchy and burned instead of soft and cooked.
Once noodles have cooked, serve warm with a side of bread or rolls.  
Freeze any leftovers.

Enjoy!


<--Click on the magic button for nutrition info and a printer friendly version

Linking up
Monday
A Round TuitMasterpiece MondayMarket Yourself MondayRecipe Sharing MondayMelt in Your Mouth MondayMotivate Me MondayMade by You MondaysMade with LoveCraft-O-Manic MondaySweet Sharing MondayMarvelous MondaysMix it Up MondaysMake it PrettyMop It Up MondayBusy Monday,
Wednesday
Thursday
Weekend
Weekend Wrap UpStrut Your StuffCheck me Out Show and TellSaturday SpotlightGreat IdeasYour Great IdeaShare it SaturdaySaturday Sunday ShowcaseThink PinkNifty Thrifty SundayNot Baaad SundayScrumptious Sunday Recipe Link PartyThat DIY Party,Overflowing with Creativity PartyA Bouquet of TalentWill Cook for Smiles

Wednesday, January 8, 2014

Birthday Card Organizer

Welcome to 2014!  I can't believe we're already into January.  I know many people have set organization goals for themselves for the year, and I wanted to share a quick tutorial with you to help you stay organized and make sure you don't forget any birthday's this year!
I've recently gotten into card-making (stay tuned for more posts on this!) and one thing I wanted to do was make handmade cards for all of my friends and family this year.  I like to plan ahead and put forth my best effort, and not be rushing to finish a card on the day I have to mail it.  So I decided to make a birthday card organizer so that when I have time, I can make my cards for the next few months and then they will be all organized and ready to go when they need to go in the mail!
What you Need:
  • Mini Binder (I got mine at Target)
  • Avery Mini binder folders (2 packets of 5) or Mini sheet protectors
  • 12 sheets of cardstock
  • Post it notes
  • Optional - cutting machine like Cricut or Silhouette

What to Do:
This project is really pretty simple.
Using your cardstock, you are going to cut out tabs/dividers.  Hole punch and label them for each month.
You can either cut out the tabs and hole punch them by hand (just trace around them to create your own template).  Alternatively, you can use a Cricut or Silhouette to cut them out for you.  I got a Silhouette in their After Thanksgiving Sale and I love it!  This is my first big project with it and I'm so happy with how it turned out!  I designed my own set of six tabs for mini binders with three holes.
Use post it notes to write out holidays or birthdays for each month.
Place the Avery folders behind the tabs and there you go!  You can plan out your next few months of card giving and keep them all together so you are prepared when holidays or birthdays come up!  Place your cards in the folders and you'll be all ready and make sure to not forget a birthday! 
If cardmaking is not your thing, you can also create this and use it to store bought cards instead.
One thing to note, the folders only come in packs of five.  It works out fine for me, since I have two months where there are not birthdays, so it's fine for me.

If anyone can tell me how to save and share the silhouette cutting file or turn it into a free SVG file, I'd be happy to share the mini binder tabs I designed!
*Note, I think I can e-mail the Silhouette cutting file I made - e-mail me if you would like it!

Edit - Click here to get the download for mini binder tabs.

Good luck with getting organized for 2014!  Have a great week!

 Linking up:
Wednesday
Create and ShareSugar and SpiceWhat I Whipped UpWhatever Goes WednesdayShow me what ya GotWow me Wednesday{Wow Me} WednesdayCast PartyYour Whims WednesdayFluster's Creative MusterWednesday WhatsitShow and ShareDream to Reality, Wow Us Wednesday, A Little Bird Told Me, And Sew We Craft TogetherWe did it!, We Made that!, Two Girls and a Party
Thursday
Catch a GlimpseChic and CraftyThursday Favorite Things, Live Laugh LinkyCreative PrincessShare your Cup, , Blooming Linky PartyLink it UpMade you Look,  Blog StalkingWildly OriginalShowcase your TalentSomewhat SimpleKeep Calm and Link UpFive Little ChefsLamberts LatelyInspire Us Thursday, Weekly CreativeAll Things Pretty
Friday
Show and Tell FridayFriday Favorites,Lovely Crafty WeekendWeekend WanderWeekend Bloggy ReadingFlaunt it Friday504 MainFriday FavsFancy This Friday, Flash Blog Friday, Finished FridayFreedom FridayShow off Friday, Keep Calm and Link Up, Weekend Wonders, I'm loving it, Friday FavsPity Party, Dare to Share, F Friday, Craftionary Link Party, Do Something Crafty, Get CraftyShine on Friday!
Weekend
Weekend Wrap UpStrut Your StuffCheck me Out Show and TellSaturday SpotlightYour Great IdeaShare it SaturdaySunday ShowcaseThink PinkNifty Thrifty SundayNot Baaad SundayThat DIY Party,  A Bouquet of TalentWeekend Creative

Monday

Thursday, January 2, 2014

2013 Goals in Review

So instead of doing a year in review post, I'm going to share my year-end update on my 2013 goals. 

So... I set some lofty goals at the beginning of the year (I still don't really want to call them resolutions... resolutions too often get broken. So... I set goals. I just happened to set them on Jan. 1st)
How am I doing?
Let's take a look.


1. Be active everyday - at least do something! I'm good about being active during the week and hitting the gym - the weekends, not so much. I'd like to change that.
Take a look at how I did.  December was a rough month, with a lot of missed days due to traveling, holidays, and sickness.  But overall, I think I improved my activity level, which was my goal :).

2. Run 400 miles. I'm worried this might be too much of a stretch for me, considering I don't go much more than 3 miles ever (three times a week), but I can give it a try! I ran about 250 in 2012, so maybe I can be a little more consistent and up my mileage in 2013.
This month I ran 28.94 Miles.  This brings my total 2013 mileage to 400.42/400 miles. I did it!!!!  I don't think I've ever run this many miles in a year - ever - even when I was in Cross Country - I am really proud of myself for accomplishing this goal!

3. Run my first 5K since high school cross country.
I'm registered for a race in September!  I was registered, but then had to cancel because of a family obligation, so still no 5K.  Didn't happen, so I will make this one a priority in 2014

4. Finish my prayer shawl for St. Mary's Hospital
Finished in April during my spring break - it's huge!

5. Knit 5 Chemo caps   
Total is now 4/5.
Finished 4 - Got sick in December, so didn't have time for number 5, but I still donated over 50 hours of time between my shawl and other chemo caps, so I am happy. 

6. Finish one of my other UFO knitting projects
Not yet.  Another one I need to work on, better get moving as the year is ticking away

7. Take two masters classes - I am very unmotivated about working towards my master's but I know I should be taking advantage of the tuition reimbursement at Connections Academy
Didn't happen.  I'm not motivated to take the class and worried about overbooking myself. I value the little free time that I do have!  I'm also not sure about the major or the school I was taking classes, I might explore some other options in 2014. 

8. Visit one new city or state
Done in Feb. during my honeymoon. I was in Ft. Lauderdale, San Juan Puerto Rico, St. Thomas USVI, and Half Moon Cay.
Also went to Thunder Bay Ontario this month!  Whoot!  Added another new country :)  But sadly no new passport stamps :(

9. Be a better wife (I know, it's vague), but somedays I don't feel like I do that well in this area. Maybe I'm still getting the hang of it since I've only been married 2 1/2 months.
Matt thinks I do great at this one, I don't always agree.  Matt and I have been married for 14 months now - a lot has happened in the first year of our marriage.  It was a lot of ups and downs and we sure put our vows to the test.  But I couldn't imagine spending my life with anyone else, so I am happy to be his wife and hope to continue to work hard to be a good wife and do my part to make a good marriage. 

10. Be kinder to myself. M keeps telling me that I'm too hard on myself and need to relax some and be nicer to myself and everything will be ok. We both know that being kind to yourself can be tough, but I want to try to make some improvements in this area.
Still a work in progress.  Looking back on these goals, i don't feel like I 100% met a lot of them, which would usually turn me into a ball of stress and regret, but this time, I'm working to keep things in perspective.  I did get a lot done in the past year and had a lot of good times and memories and surprised myself keeping my cool when dealing with some pretty major challenges.  So in the end, I have happy with 2013, and more than ready to move on to 2014. 

I haven't decided yet if I will post goals for 2014 yet.  I'm not in the mood to set any right now, so I might set some smaller monthly goals.  This was actually the first time I had set big New Year's goals.  So we'll see what happens.  I know I do have some things I want to work on and accomplish in the new year.  I think that writing things down helps me stay focused and track my progress more.

Have a great 2014 everyone and thanks for all of your support in 2013!
Related Posts Plugin for WordPress, Blogger...