Wednesday, November 19, 2014

Manly Happy Birthday

I know I have been absent from the craft posts for quite awhile.  I've been working on lots of little things, but keep forgetting to take pictures!
November is a busy month for birthdays in my family.  My dad, brother in law, father in law, husband and godson are all born in November - it's a busy month!  Today, I wanted to share some cute cards I made for my dad and father-in-law for their birthdays.  These cards would also make great Father's day cards!
The idea is based off of a cardmaking class I took once, but I adjusted it based on what I had on hand.

First you will need to cut your "suit" fabric.  One piece should be 3 1/4 inches by 5 1/2 inches.  The other side should be 1 1/2 by 5 1/2 inches.
Inked edges of both pieces of paper.
Now you need to create the fold for the lapel.  To do this, on the top of the larger piece of paper, make a mark 2 inches from the top left corner, and a mark 3 inches on the left side from the bottom.  Score along this line to connect the two marks and fold back.
If you are using double sided designer paper - you are all set.  I was using designer paper, and didn't like the coordinating side, so I cut a piece of the teal paper to cover up the folded back piece.
On the smaller piece of paper, make a mark on the left edge, five inches from the bottom.  On the right side, make a mark 3 inches from the bottom.  Score between the two marks and fold back.
Using a tape gun or your adhesive of choice, adhere the narrow piece of paper.  Then apply the larger piece of paper, overlapping the smaller piece of paper slightly.
Trim off the overhang from your lapel on the smaller piece of paper.
Stamp on your Sentiment.
Adhere buttons using glue dots.
For the bow tie, use a punch or trace a bow tie shape and adhere using foam squares. I traced mine as I don't have a bow tie punch!


Buttons are from Jo-Anne's
Sentiment is Paper Smooches

Linking up at some of these great parties!


Monday, November 3, 2014

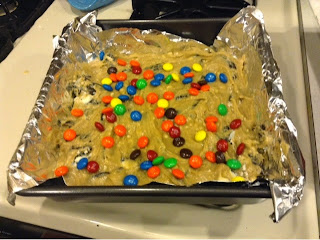
Loaded Cookie Bars

I hope you all had a great weekend (and fun celebrating Halloween if you do so).  Post Halloween there is usually lots of candy and treats lying around, so it's a great time to make these cookies.  The base dough stays the same, but you can basically chose your mix-ins, depending on what you have on hand, leftover, or whatever sounds good!  Oreos or graham crackers add a perfect crunch, and M&Ms, chocolate chips, or a variety of bit sized candy bars add some sweetness.  These cookies really leave it up to you!
These make up in no time at all and are great treat to share, or enjoy on your own with a tall glass of milk.  I took them to work with me and they lasted just minutes!

Loaded Cookie Bars
Recipe Adapted from Averi Cooks

Ingredients:
1/2 cup unsalted butter, melted
1 egg
1 cup brown sugar
1 TBSP vanilla
1 cup flour
2 cups/12 chopped Oreos (or grahman crackers, or pretzels, or other cookies)
1/2 cup M&Ms (or other candy/chocolate chips)

Directions:
To begin, preheat oven to 350 degrees.  Then prep an 8x8 pan with foil and spay with cooking spray.
Begin making the cookies by melting the butter.  Let cool slightly, then add egg.  Mix in brown sugar and vanilla and mix until smoother.  Next, add the flour and stir until just combined, being careful to not overmix.  Then it is time to fold in your add ons.  I used Oreos and M&Ms but you can use whatever you want!  I mixed in half of my M&Ms and held back the other half.
Place batter into pan and smooth or pat out as best you can (dough will be very very sticky).  Then sprinkle remaining M&Ms or candy on top of the batter. 
Bake for 20 to 22 minutes.  Top should not look doughy and the edges should be just barely browning.  If you can, use a toothpick to test the center.
Make sure to let the bars cool in the pan for at least a half hour before slicing.  Store in an airtight container. 
Enjoy!


Linking up at some of these great parties!


Monday, October 20, 2014

One Dish Chicken Dinner (Winner Winner!)

I can't believe is's already the middle of October.  Wow - this fall is sure flying by!  With the school year in full swing, evenings are busy with sports practices, homework, and many other things.  It can be hard to get in a routine of having a home-cooked meal as a family.  This One Dish chicken dinner is amazing!  One dish (fewer dishes to do!) and simply throw and put in the oven and an hour later you have a wonderful hot (healthy!) dinner for your family!


One Dish Wonder - Chicken Dinner
Recipe adapted form: Mama Say What

Ingredients:
  • 2 pounds boneless skinless chicken breast - cut into bite sized chunks
  • 2 1/2 cups fresh cut green beans (can also use frozen or canned)
  • 4 potatoes cubed
  • 2 TBSP melted butter
  • 1 packet Good Seasons Italian Dressing Mix

Directions:
First, begin preheating oven to 350 degrees.  Next, spray a 9x13 baking pan with cooking spray.  Place your green beans along one of the long sides of the pan, place your chicken chunks in the middle, and place your potatoes along the other long side of the pan.  Sprinkle the Italian Dressing packet over the entire pan and do the same with the melted butter.  Cover with aluminum foil and bake for one hour at 350 degree. 
Enjoy this simple (one dish!) dinner!


<--- click the magic button for nutrition info and a printer friendly version!


Linking up at some of these great parties!

Monday, October 13, 2014

Spiced oatmeal cookies


Happy October!  The weather has definitely turned to fall around here.  Two weeks ago it was 80 degrees, this past weekend it was blustery and highs in the 40 (With some snow mixing in the rain overnight - so not ready for that!).  Fall sure did arrive with a vengeance as the calendar turned to October.  
With the cooler weather, I am definitely thinking about fall baking.  I am not really a fan of pumpkin, so you won't see tons of pumpkin spice recipes on here.  While I'm not a fan of the pumpkin flavor, spices like nutmeg and cinnamon and cloves always have a warm feeling to me and work perfectly for fall.  Enter these oatmeal spice cookies!  They are delicious and go great with a warm cup of coffee on a chilly fall morning.  
If it has oatmeal it's healthy, right? That's what my neighbor asked when I dropped off a few of these cookies to her. I told her they were healthy enough, but they sure we're delicious and I had had to hide a few for her before my husband and I devoured them all! They are very addicting and have a great taste. The light glaze adds just a hint of sweetness and I love how nice and chewy they are (due to the oatmeal)

Spiced Oatmeal Cookies
Recipe Adapted from Annie's Eats

Ingredients:
For the dough
  • 1 cup old fashioned oatmeal
  • 1 cup flour
  • 1 1/2 tsp baking powder
  • 1/4 tsp baking soda
  • 1/4 tsp salt
  • 1/2 tsp cinnamon
  • 1/4 tsp nutmeg
  • 8 TBSP butter (1 stick)
  • 1/2 cup brown sugar
  • 1/4 cup sugar
  • 1 egg
  • 1 tsp vanilla
For the icing
  • 1 1/2 cups powdered sugar
  • 2 TBSP milk
  • 1/2 tsp vanilla
Directions:
Using a stand mixer, combing butter and sugars until light and fluffy.  Add in egg and vanilla.  Slowly add the oatmeal, flour, baking powder, baking soda, salt, cinnamon, and nutmeg.  Blend well.  Using a cookie scoop, place on baking sheets covered with a silicone baking mat (or parchment paper, or grease cookie sheets). 
Bake for 10 minutes at 350 degree.  Let cool for a few minutes on baking sheet, then transfer to a wire rack to finish cooling.
When cookies are completely cooled, make your icing.
Combine powdered sugar, milk, and vanilla and wish until smooth.  Add more sugar if thicker icing is desired, more milk to make it more runny.  Carefully dip the top side of the cookie in the icing, hold cookie over icing bowl for a few seconds to let excess icing drain off.  Let icing set before storing cookies. 
Enjoy!
 

<--- click the magic button for nutrition info and a printer friendly version!


Linking up at some of these great parties!


Monday, September 22, 2014

Grilled Pineapple Chicken


As promised last week, I'm back again today to share another delicious grill recipe with you.  This one was so good, my husband didn't even blink an eye when I said we would be having ti two weeks in a row (we ate it all up the first time before I even got a chance to take any photos!)
This chicken tastes amazing.  The marinade comes together in minutes and can be made the night before, or before you leave for work in the morning.  The combination of the sweet pineapple and the soy sauce give the chicken a tremendous flavor.  Give it a try at your next cook out!


Pineapple Grilled Chicken
Adapted from: Six Sisters Stuff

Ingredients:

  • 2 Large boneless skinless chicken breasts (about 1 - 1.5 lbs)
  • 1/2 cup diet lemon-lime pop such as Sierra Mist or Sprite (regular pop works too)
  • 1/2 can crushed pineapple (pineapple chunks or tidbits work too if that's what you have on hand!  If using bigger chunks of pineapple make sure to drain all of the pineapple juice in the can for the marinade)
  • 3 TBSP soy sauce
  • 4 TBSP brown sugar


Directions:
To begin, mix up your marinade in a large bowl (preferably one with a tight lid).  To mix the marinade, mix up your lemon-lime pop, pineapple (including all of the juice from the can), soy sauce, and brown sugar.  Mix until sugar is dissolved
Place chicken in marinade.  I like cut the breasts in half so they soak up the marinade better (and then they are better portion sizes! The boneless skinless chicken breast from my meat department are always so huge!).  Place lid on bowl and shake well (hold the lid on tight!) to coat the chicken well with the marinade.  If you don't have a lid for your bowl, you can just stir the chicken into the marinade.
Refrigerate for at least four hours (preferably overnight or all day while you are at work - better flavor :))
Grill chicken until internal temperate is 165 degrees and no longer pink in the middle.
This chicken goes great with homemade bread and corn from the freezer - or fresh corn on the cob!


Linking up at some of these great parties!

Monday, September 15, 2014

Ranch Beer Chicken and Potato Kabobs

We may be into September, but we're not done grilling yet!  In the next few weeks I have two great grilling recipes for your to try - so excited for them!
First up are these Ranch Beer Chicken and Potato kabobs.  Yes, I do live right next to Wisconsin, yes, people from Wisconsin love anything that involves beer or cheese. :)  This is the perfect recipe to take advantage of a nice fall day and enjoy a cookout with friends.
The marinade is super easy to make and adds a delicious flavor to the chicken and potatoes.  And no, you won't get drunk off of this either ;)  The beer just adds flavor, but the alcohol cooks right off in the grilling process.
I hope you enjoy!

Ranch Beer Chicken Kabobs
Recipe adapted from Frugal Foodie Mama 

Ingredients
  • 2 pounds of chicken - cut into bite sized chunks
  • 1 pounds potatoes
  • 1 TBSP ranch salad dressing and dip mix
  • 2 TBSP olive oil
  • 2-3 cloves of garlic, minced
  • 1/2 cup light colored beer
Directions
First, make your marinade by combing the beer, powered ranch dressing mix, garlic, and olive oil inn a small bowl.  In a medium sized bow, place your chicken chunks and cover with about 2/3 of the marinade.  Place lid on medium bowl and shake well to coat the chicken.  Then refrigerate for at least two hours.  Shake again at least once more.  Cover and refrigerated the rest of the marinade.
30 minutes prior to heating up the grill, begin parboiling the potatoes.  You want them to be softish on the outside, but more firm in the middle - enough to easy skewer, but not so soft that they will split when you skewer them.
Once potatoes are half cooked, place in cold water to stop the cooking process and allow potatoes to cool thoroughly. Once cooled, place potatoes in a bowl and coat with the leftover marinade.
Prepare skewers, by alternating one chicken chunk with one chunk of potato.  Cook kabobs on grill, rotating every 5 minutes.  Total cooking time should be about 20 minutes, depending in heat of grill.  Make sure that chicken is cooked all the way through and potatoes should be crispy.
Makes 5 servings.

Enjoy!

Linking up at some of these great parties!

Monday, August 25, 2014

5 Simple Steps to Freezing Corn

Where has the summer gone?  I can't believe that I am back to work and Labor Day is just around the corner.  With the close of summer, many people are canning, preserving, and freezing the produce of summer.  Slowly but surely, I am learning different ways to preserve summer's bounty and while it is tons of work, I love the feeling of accomplishment when I am done.  And both my husband and I love being able to eat our own fruits and vegetables all through the winter.  While we don't have a garden, we do get most of our produce from local stands or the farmer's market, so it is usually all locally grown.
The first thing I learned to freeze was corn, as it is a simple process and something both my husband and I really really enjoy.  Corn is a staple at our meals, appearing at least once a week.
Freezing corn is a simple process.  My husband likes to find a roadside stand with the peaches and cream corn or "super" sweet corn, because that is what he likes best and we feel that it retains a great flavor, even after being frozen for months.  Starting with a good sweet corn is important, because then we don't have to add anything at all to our corn, not even butter!  This year we got 5 (baker's) dozen which yielded around 70 cups of corn.

Step 1 Shuck the corn - easy enough.  Try to get off as much of the "hair" as possible.

Step 2 Blanch the corn by boiling it in water for 5 minutes.  Blanching destroys the enzymes in the corn that would cause it to lose its color, taste, and texture.

Step 3 Immediately place corn in ice cold water.  This stops the cooking process

Step 4 Cut the corn off the cob either using a sharp knife or with a mandolin or a corn peeler tool like this one (which is what we use - so easy!).  You want to cut about 2/3 of the kernel off, but don't cut into the cob.  I cut my corn in a cake pan to make it easier and less messy.

Step 5 Measure your corn into Ziploc freezer bags.  For the two of us, I usually put in two cups of corn into a quart Ziploc bag.  Squeeze out as much air as you can from the bag.  Then wiggle the corn around so that it lays flat and place in the freezer.  Once it's frozen, then you can stand the corn upright, like a book, which makes for easy storing and grabbing.

I hope you enjoy making your own corn.  I know you'll enjoy the fresh taste of summer in the middle of winter.

If you have any questions, let me know!

Linking up at some of these great parties!


Monday, August 18, 2014

Smore Bars

Ahhh Summertime, how quickly it goes!  A few blinks and my short time off from work goes by in an instant.  We have had a ton of fun this summer, but it's back to work I go.  As you read this, I will be sitting in my in-service meetings.  While I enjoy the fresh start and the excitement of a new school year, I'm not sure I'm ready to transition back to the grind of working everyday.  I sure do love my summers!


This sweet treat today is a great one to bring back memories of summer - camping, hiking, bonfires, and of course, s'mores!  I was lucky enough to be able to go camping three times with my husband this summer (and with both sets of our parents as well, one time each, and one time with my friends).  Of course, every time we go camping, we make s'mores!
I have a coworker who has a major sweet tooth, and I love making treats to bring with me when I have to travel to the office every month.  For a long time, he has been requesting a Hershey cookie with graham crackers.  I hadn't heard of such a thing, but of course, was able to find something on Pinterest!  I made these s'more bars to celebrate the end of summer (or if you happen to read this in the middle of winter, it can be a sweet reminder of summer!).  

S'more Bars
Recipe Adapted from: I Heart Naptime

Ingredients:
  • Crust:
    • 1/2 cup melted butter
    • 1 1/2 cup graham cracker crumbs
  • Dough
    • 2 cups brown sugar
    • 2/3 cup butter
    • 2 eggs
    • 2 1/2 cup flour
    • 2 1/4 tsp baking powder
    • 1/2 tsp salt
    • 1 tsp vanilla
    • 1 cup chocolate chips
    • 1 cup mini marshmallows
  • Topping
    • 1 Hershey bar - break each little bar into pieces
    • 1 Graham cracker - break into pieces
    • 1/2 cup mini marshmallows


Directions:
Heat the oven to 325 degrees. 
Make the crust by combining the melted butter and graham cracker crumbs in a small bowl using a fork.  You will need about 8 crackers (full sheets) to create the crust.  Once the crust has been made, line a 9x13 pan with foil and press the crust into the pan.  
Next cream the butter and sugar together, then add in eggs and vanilla and mix until combined.  Add in the baking powder and salt, then mix in the flour.  Finally, fold in the chocolate chips.
Once the dough is made, flour your hands and press the dough on top of the crust and flatten it out.
Then add the topping of graham cracker pieces, broken chocolate, and left over mini marshmallows. 
Bake for 30-35 minutes.  Test middle with a tooth pick.  Dough will be soft, but toothpick should come out clean. 
Allow bars to cool completely before cutting.  Then enjoy with ice cream or a tall glass of milk!


<--- click the magic button for nutrition info and a printer friendly version!


Linking up at some of these great parties!

Wednesday, August 6, 2014

#100 Happy Days (vol. 4)

Here's an update on my 100 happy days.  Since I don't have a fancy phone (I have a dumb phone, lol), it's hard for me to always remember to grab a picture everyday, but I do what I can.  
Have a wonderful day and make sure to look for the happy moments in each day!

Day 38 (7/24) - Another great night at Volleyball in the valley.  My serving was spot on again and I served 10 in a row in both the first and the last game!

Day 39 - Woot!  Productive day!  I have happy moments to share today, cause I have two mega happy moments.  1 - I did my first big vinyl project and labeled my Tupperware.  2 - I ran 4 miles!!!  In 40 minutes!!!!  This is a huge deal for me!  Personal best for both distance and length of time being able to run.  


Day 40 - Went to see Legally Blonde the musical at the local theater with my nice neighbor while M was working

Day 41 - Bonfire and popcorn with my husband - love relaxing evenings!

Day 42 - Still loving my flowers :) 

Day 43 Finally Finally Finally got the insurance straightened out for allergy shots! (8+ months in the making!)

Day 44 (7/30) - First corn on the cob for the season - yum!

Day 45 - Very impressed with myself and these cookies!

Day 46 (8/1) - Got to see family and celebrate at the Grooms Dinner

Day 47 - My little brother got married!!!!

Day 48 - I am so honored to be a godmother for the first time - sweet little Max!

Day 49 - I have a car... with a working air conditioning!

Day 50 (Halfway to 100!) (8/5)  Our power is back on (after being out since 4 pm yesterday!) And since I had to clear out the fridge, it got a good cleaning.

Day 51 - A daytrip to Noah's Ark with family topped off by some amazing pizza at MooseJaw.  So Thankful the weather stayed nice and I didn't get too cold!

Day 52 - Enjoyed playing volleyball with a super big group!

Day 53 - Saw the Beach Boys in concert!

Day 54 - Matt's cousin got Married!

Day 55 - My parents joined us in Lanesboro for biking

Day 56 - More biking - we got in 37.5 miles and stayed dry!

Day 57 - Rollerblading to round out our active camping trip

Day 58 (8/13) - Enjoyed the sunshine of my lunch walk on my first day back to work.


Monday, August 4, 2014

Crockpot honey chicken and Quinoa

Whew!  My brother is married and I become a godmother - what a weekend!  So much fun and so much celebrating!  It was a wonderful time and everything went smoothly - more on that later this week :)
After such a long and busy weekend, the last thing I want to do (especially in a warm kitchen) is spend hours cooking or have the oven on heating up the house.  Today, I'm all about relaxing (and tending my dancing feet, lol).  Enter a crock-pot dinner.  I love love love the simplicity of crock-pot dinners.  They come together in minutes, cook during the day (but don't heat up the house!), and are ready whenever my husband gets home from work.  Adding in the new super-food of Quinoa is a bonus too :)

PS - this was my first time trying quinoa.  It's pretty plain tasting and has a bit of a nutty flavor, but a different kind of an aftertaste.  I think a smaller potion than pictured here, or with some kind of sauce would be a bit better (but that might defeat the healthy benefits of the quinoa.  Have you cooked with quinoa before?  What's your favorite recipe?  Any suggestions for me?

Honey Chicken with Quinoa
Recipe adapted from: I <3 Naptime

Ingredients:
  • 1 1/2 lbs boneless skinless chicken breast (ok if frozen)
  • 1/4 cup soy sauce
  • 1/2 cup honey
  • 1 TBSP olive oil
  • 2 cloves garlic (minced)
  • 1 tsp salt
  • 1/2 tsp pepper
  • 1 tsp onion powder
  • 1 cup cooked quinoa or rice

Directions:
Put chicken breast in the bottom of the crock-pot.  Combine the soy sauce, honey, olive oil, onion powder, minced garlic, salt, and pepper in a small bowl and stir until well combined.  Pour mixture over chicken.  Cook on low for 4-6 hours.  Chicken should easily fall apart.
Cook quinoa in boiling water or cook rice according to directions.
When chicken is done, serve chicken over quinoa
Enjoy!


<--- click the magic button for nutrition info and a printer friendly version!


Linking up at some of these great parties!

Wednesday, July 30, 2014

Wedding Dress Shower Invitation set

As I mentioned earlier this week, my brother is getting married at the end of this week - such excitement!  Of course, we had to celebrate welcoming my brother's fiance into our family.  I'm so excited to be gaining a sister.  It's always been just my brother and I, it's nice to see our family growing a bit as we get married.  To celebrate the upcoming wedding, I offered to host a shower for my side of the family.  I had lots of fun putting my Silhouette to use (and some of my new found Royal Icing skills!)

Invitations
First off, I made the shower invitations.  I looked at hundreds (ok maybe not hundreds, but it seemed like it) of ideas on Pinterest.  And then I ran out of time, lol, and needed something relatively simple.  This idea fit the bill for the most part.  I used a dress card from the Silhouette store, but cut it in half.  
First I wrote out my text in Microsoft word so I could use the spell check.  Then I transferred my text and placed a text box inside the dress shape in Silhouette Studio. Next i used the print and cut feature (my first time!), to cut out two dresses per sheet of paper.  I cut the top half of the dress out of a pretty silver paper and glued that on top of the dress with the text.  Then I used a hot glue gun to glue the tulle over the top, an finally added a blue bow (to hide my glue marks!).  
Other than the fact that neither my mom or I caught the fact that I wrote down 2013 instead of 2014, I was really really happy with how these turned out :)


Gift - Dishcloths and Thank Yous
So once the invitations were out, I needed to come up with a gift for the lucky bride to be.  I wanted to come up with something small, but useful for my future sister in law.  Keeping with her wedding theme of blue and sliver, I made her some blue dishcloths (because I make a pair for every bridal shower I'm invited to), and then I decided to make some thank you notes to match the invitations.  When my aunt threw a shower for me when I was engaged, she gave me a set of thank you notes that matched the invitations that had been sent out.  I found it to be a very thoughtful gift and it made it very easy to quickly write my thanks yous after the shower.  Since this was my first time hosting a shower on my own, I wanted to do the same thing for my future sister-in-law.
I used the same dress card pattern as I did for the invitations, but added blue ribbons and a thanks stamp from Paper Smooches. 

Dessert
I made a simple meal for lunch during the shower, but I wanted to go a little bit fancier for dessert.  After checking with the bride to be, I learned that she preferred cookies over cake (which was just fine with me).  This gave me another chance to practice my royal icing skills.  I found a dress cookie cutter at Williams Sonama and decided to make hearts for something a little smaller (and simpler!).  The cookies were definitely a big hit with my guests!  I put their initials on the hearts and created white dresses with blue sashes and bows.  


Now to prep desserts for the grooms dinner and pack for a weekend full of fun!
Have a great day!


Linking up at some of these great parties!

Monday, July 28, 2014

Bachelorette Cookies - Royal Icing

My "little" brother is getting married at the end of the week.  I can't believe it!!!  While he is certainly not little anymore (in fact, he' been taller than me since high school), it's still a little weird for him to be getting married.  Despite that fact that he's getting married makes me feel incredibly old, I am over the moon happy for him and his bride to be.  There's been a lot of celebrating going on recently, and of course, I've been baking and crafting to celebrate the occasion, because that's what I do :)

I hosted a shower for my sister-in-law-to be, and I'll share details on that soon, but first I couldn't wait to share these bachelorette party cookies.  Can you say cute and fun?  Even better - they are Delicious - with a capital D.  Love love Love these cookies.  


I had been wanting to try royal icing for a long time, but had been a little (or a lot) intimidated by it.  This occasion gave me the push I needed (with a little inspiration from Pinterest!)
After giving the Royal Icing a try, I have to say that it is definitely not as scary as I thought, however, it IS time consuming.  So not something I want to do all the time, but for an added "WOW!" factor, it's certainly possible.  Royal icing gives you a lot more detail when frosting cookies, so f you are looking for something fancier, definitely give it a try.  If it's your first time doing royal icing, I recommend attempting now more than 2-3 colors - it will make your life much easier, I promise! 
Just a note - the meringue powder for the icing can be found at either a craft store (like Hobby Lobby or Michael s, in their baking isle) or at the grocery store.


Royal Icing Bachelorette Cookies
Ingredients:

  • 4 cups powdered sugar
  • 2 TBSP meringue powder
  • 5 TBSP water (plus more later for thinning)


Since this is a bit of a special recipe, there are also some tools you will need.  

  • Sugar cookies (make sure they are completely cooled!)
  • Gel Icing colors (I use Wilton brand)
  • Small containers with lids for each color of icing you want to use
  • Spoons
  • Toothpicks
  • Pastry bags with small round tips (I use size 2 or 3 for flooding, and smaller/other sizes for designs and decorating)
  • Squeeze bottles

Instructions:
First things first, you'll need to make your icing.  Combine the powdered sugar, meringue power, and water in a stand mixer with the paddle attachment.  Mix on low until well blended, then keep mixing!  You will want to mix for about 5 minutes until the icing has a matte appearance (it should not be shiny at all).  Now you will need to add a tiny amount of water - start with 1/2 teaspoons, until it becomes piping consistency.  Piping consistency is when you pick some icing up with a spoon and let it run back into the bowl, it should take about 5 seconds for the icing to be reabsorbed into the rest of the icing.  You can also test out a small amount in your pastry bag as well.  Try not to let your icing get too runny at this point (although if it does get too runny, you can add more powdered sugar to stiffen it up)
*Hint - while you are working with royal icing, make sure to keep any icing you are using covered in a container so that it does not harden on you!  Any pastry bags you are not using (but have incing in them) should be stood up in a glass with a bit of water in the bottom so that the icing in the tip does not harden)*
Ok, so now you have piping icing.  The next step is to tint your icing the color you want to outline your cookies.  Once your icing is colored, you are going to pipe a border around the edge of each cookie.  Let the icing set and harden.  
Next step will be flooding your cookies.  Once your border has hardened, you are going to thin out some more icing.  Take some of your icing in a separate bowl, and add a tiny bit more water.  Now you want the icing to flow off a spoon and disappear in 2-3 seconds back into the bowl of icing.  Let the icing stand about 5 minutes to let any bubble come to the surface, then give the icing one more gentle stir to pop the bubbles (this will save you time later).  Once icing is thinned out, use your squeeze bottles to "flood" your cookie with your main color of icing.  *Hint, you can use a toothpick to help drag the icing to the corners of your cookie if need.  Toothpicks also work great to pop any air bubbles that appear on your cookie.  
Before moving on the the next step, let you cookies dry and harden really well.  You can even leave them out overnight, if needed, to make sure the icing is completely dry.  depending on the weather or the temperature of your kitchen, your cookies could be dry in an hour, but wait longer if you are unsure.  The royal icing helps seal in the moisture of the cookie, so depending what type of sugar cookie you use, you shouldn't have to worry about them drying out. 
Finally, once your main color is done, you are ready to decorate with your piping icing again.  Let dry for at least an hour before packaging or storing.  I do not recommend freezing cookies that have been decorated with royal icing as the icing with gather condensation in the freezer and look funny. 
Congratulations!  You did it!  You decorated with Royal Icing!

To make lingerie cookies, I used a heart cookie cutter - who knew?!


<--- click the magic button for nutrition info and a printer friendly version!


Linking up at some of these great parties!


Truly Lovely
Related Posts Plugin for WordPress, Blogger...